DeLonghi ESAM6700 Owner Manual - Page 18
Hot Water, Cleaning - manual
 |
View all DeLonghi ESAM6700 manuals
Add to My Manuals
Save this manual to your list of manuals |
Page 18 highlights
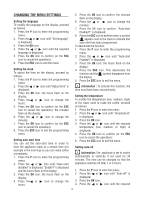
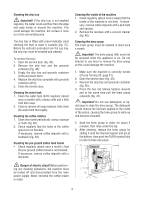
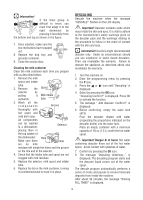
6. As soon as the coffee in the cup reaches the required level, press the icon. Coffee delivery stops. The machine is now reprogrammed with the new quantities. HOT WATER Preparation Important! Danger of burns. Never leave the machine unsupervised while delivering hot water. The hot water spout becomes hot while water is being delivered and must be held by the handle only. 1. Make sure the hot water spout is attached correctly (fig. 4). 2. Place a container under the spout (as close as possible to avoid splashes). 3 Press the icon (fig. 34). The message "Rinsing" "Hot water..." is displayed. 4. Press the icon to select the "Hot water..." function (the selected message flashes on the display) and confirm the selection by pressing the OK icon (or cancel the selection by pressing the ESC icon). 5. Water flows out of the spout. Delivery stops automatically after 8.5 oz (250ml). 6. To interrupt delivery of hot water manually, press the icon again. CLEANING Cleaning the coffee maker The following parts of the appliance must be cleaned regularly: - coffee grounds container (A18), - drip tray (A16), - water tank (A13), - coffee spouts (A20) and hot water nozzle (A11), - pre-ground coffee feed funnel (A8), - inside the machine, accessible after opening the service door (A19), - brew group (A12), - milk container (B) - control panel (C) Important! • Do not use solvents, abrasive detergents or alcohol to clean the coffee maker. With De'Longhi superautomatic coffee makers, you need not use chemical products to clean the machine. The descaler recommended by De'Longhi is made from natural and completely biodegradable substances. • None of the components of the appliance can be washed in a dishwasher with the exception of the milk container (B). • Do not use metal objects to remove encrustations or coffee deposits as they could scratch metal or plastic surfaces. Important! You should not deliver hot water for more than two minutes at a time. Changing the quantity The appliance is factory preset to automatically deliver 8.5 oz (250ml). To modify these quantities, proceed as follows: 1. Position a container under the spouts. 2. Once the "Hot water" function has been selected, press and hold the OK icon (about 8 seconds) until "Hot water Program quantity" appears and the icon flashes. • When the hot water in the cup reaches the required level, press the icon again. The machine is now reprogrammed with the new quantity. Cleaning the coffee grounds container When "EMPTY GROUNDS CONTAINER" is displayed, the grounds container must be emptied and cleaned. Until the grounds container has been cleaned, the appliance continues to display the message and coffee cannot be made. To clean: • open the service door on the front of the appliance (fig. 35), extract the drip tray (fig. 36), empty and clean. • Empty the grounds container (A18) and clean thoroughly to remove all residues left on the bottom. Important! when removing the drip tray, the grounds container must be emptied, even if it is not completely full. If this is not done, when you make the next coffees, the grounds container may fill up more than expected and clog the machine. 17
-
 1
1 -
2
-
3
-
4
-
5
-
6
-
7
-
8
-
9
-
10
-
11
-
12
-
 13
13 -
 14
14 -
 15
15 -
 16
16 -
 17
17 -
 18
18 -
 19
19 -
 20
20 -
 21
21 -
 22
22 -
 23
23 -
24
-
25
 |
 |