Dell 1100 Owner's Manual - Page 33
Printing - laser printer manual
 |
UPC - 708562765657
View all Dell 1100 manuals
Add to My Manuals
Save this manual to your list of manuals |
Page 33 highlights
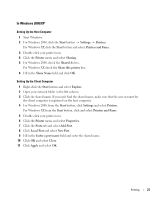
Printing Basic Printing 1 Load paper. See page 19. 2 With your document open, click File → Print. Make sure that your printer is selected. 3 To change the printer settings, click Properties, Preferences, Options, or Setup, depending on the program or operating system. The printer properties window displays. 4 From the five tabs on the top of the printer properties window, confirm the selections. 5 Click OK until the Print window appears. 6 Click OK or Print, depending on the program or operating system, to start printing. NOTE: Press on the operator panel to cancel a print job. In Manual Feed mode, you can't cancel a print job by pressing . Accessing Printer Properties Change printer settings in the printer properties tabs. The printer properties window differs, depending on your operating system. 1 With your document open, click File → Print. The Print window appears. 2 In the Print window, click Properties, Preferences, Options, or Setup, depending on your program or operating system. 3 For details about the printer properties tabs, please refer to the HTML User's Guide. Setting High Altitude Correction If your printer is going to be used at an altitude above 2,500 m (8,200 ft), you can optimize the print quality for those circumstances using the High Altitude Correction option. 1 Click the Windows Start menu. 2 Click Settings and then Printer, or Printers and Faxes. 3 Select the Dell Laser Printer 1100 icon. 4 Right-click on the printer icon and select Properties. 5 Click the Printer tab and select the High Altitude Correction checkbox. Printing 25
-
 1
1 -
2
-
3
-
4
-
5
-
6
-
7
-
8
-
9
-
10
-
11
-
12
-
13
-
14
-
15
-
16
-
17
-
18
-
19
-
20
-
21
-
22
-
23
-
24
-
25
-
26
-
27
-
 28
28 -
 29
29 -
 30
30 -
 31
31 -
 32
32 -
 33
33 -
 34
34 -
 35
35 -
 36
36 -
 37
37 -
 38
38 -
39
-
40
-
41
-
42
-
43
-
44
-
45
-
46
-
47
-
48
-
49
-
50
-
51
-
52
-
53
-
54
-
55
-
56
-
57
-
58
-
59
-
60
-
61
-
62
-
63
-
64
-
65
-
66
-
67
-
68
-
69
-
70
-
71
-
72
-
73
-
74
-
75
-
76
-
77
-
78
-
79
-
80
-
81
-
82
-
83
-
84
-
85
-
86
-
87
-
88
-
89
-
90
-
91
-
92
-
93
-
94
-
95
 |
 |
