Dell 1110 Laser Mono Printer User's Guide - Page 19
Printing
 |
View all Dell 1110 Laser Mono Printer manuals
Add to My Manuals
Save this manual to your list of manuals |
Page 19 highlights
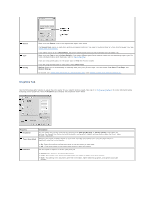
Printing Printing a Document Printer Settings Printing Multiple Pages on One Sheet of Paper Printing Posters Printing on Both Sides of Paper (Manual Duplex) Fitting Your Document to a Selected Paper Size Printing a Reduced or Enlarged Document Using Watermarks Using Overlays Setting Up a Locally Shared Printer Printing a Document The driver provided with your printer allows a wide variety of options. The features provided by the printer driver are as follows: Feature Toner Save Print Quality Option Poster Printing Multiple Pages per Sheet (N-up) Fit to Page Printing Scale Printing Watermark Overlay Windows 98/Me/2000/XP Y Y Y Y Y Y Y Y Printer Driver The following procedure describes the general steps required for printing from various Windows applications. The exact steps for printing a document may vary depending on the application program you are using. Refer to your software application's User's Guide for the exact printing procedure. 1. Open the document you want to print. 2. Select Print from the File menu. The Print window displays. It may look slightly different depending on your application. The basic print settings are selected within the Print window. These settings include the number of copies and the print range. 3. To take advantage of the printer features provided by your printer, click Preferences or Properties depending on the program or operating system in the print window and go to step 4. If you see Setup, Printer, or Options, click that button instead. Then click Properties on the next screen. 4. Click OK to close the printer properties window. 5. To start the print job, click Print or OK, depending on the program or operating system in the Print window. Canceling a Print Job There are two ways to cancel a print job: To stop a print job from the operator panel:
-
 1
1 -
2
-
3
-
4
-
5
-
6
-
7
-
8
-
9
-
10
-
11
-
12
-
13
-
 14
14 -
 15
15 -
 16
16 -
 17
17 -
 18
18 -
 19
19 -
 20
20 -
 21
21 -
 22
22 -
 23
23 -
 24
24 -
25
-
26
-
27
-
28
-
29
-
30
-
31
-
32
-
33
-
34
-
35
-
36
-
37
-
38
-
39
-
40
-
41
-
42
-
43
-
44
-
45
-
46
-
47
 |
 |
