Dell 1110 Laser Mono Printer User's Guide - Page 3
Installing the Starter Toner Cartridge - cartridges
 |
View all Dell 1110 Laser Mono Printer manuals
Add to My Manuals
Save this manual to your list of manuals |
Page 3 highlights
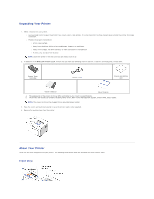
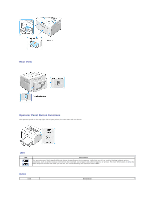
To print a demo page Manual feeding To cancel a print job Manual Duplex feeding In Ready mode, press and hold for 2 seconds until both LEDs blink slowly, and release. Press each time you load a sheet of paper in the tray, when you select Manual Feed for Source from your software application. For detailed information, see "Using Manual Feed Mode". Press during printing. blinks red while the print job is cleared from both the printer and the computer, and the printer then returns to Ready mode. This may take some time depending on the size of the print job. In Manual Feed mode, you can't cancel the print job by pressing . Press each time you load the paper back in the tray after the first side of your job has printed while manual duplex printing. For detailed information, see "Printing on Both Sides of Paper (Manual Duplex)". Installing the Starter Toner Cartridge 1. Open the front cover. 2. Unpack the starter toner cartridge from its package and thoroughly shake the cartridge from side-to-side 5 or 6 times to distribute the toner evenly inside the cartridge. Thoroughly rolling the cartridge will assure maximum copies per cartridge. NOTE: If toner comes into contact with your clothing, wipe the toner off with a dry cloth and wash your clothing in cold water. Hot water sets toner into fabric. 2. CAUTION: To prevent damage to the toner cartridge, do not expose the toner cartridge to light for more than a few minutes. CAUTION: Do not touch the green underside of the toner cartridge. Use the handle on the cartridge to avoid touching this area. 3. Pull the tape to remove the protective paper. 4. Locate the cartridge slots inside the printer, one on each side.
-
 1
1 -
 2
2 -
 3
3 -
 4
4 -
 5
5 -
 6
6 -
 7
7 -
 8
8 -
 9
9 -
10
-
11
-
12
-
13
-
14
-
15
-
16
-
17
-
18
-
19
-
20
-
21
-
22
-
23
-
24
-
25
-
26
-
27
-
28
-
29
-
30
-
31
-
32
-
33
-
34
-
35
-
36
-
37
-
38
-
39
-
40
-
41
-
42
-
43
-
44
-
45
-
46
-
47
 |
 |
