Dell 1125 Mono Laser User's Guide - Page 78
Dell MFP 1125 Fax
 |
View all Dell 1125 Mono Laser manuals
Add to My Manuals
Save this manual to your list of manuals |
Page 78 highlights
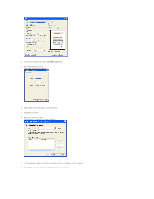
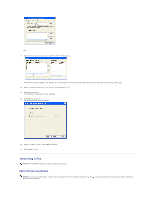
2. In the Printer Name field, select Dell MFP 1125 Fax. 3. Click the Properties button. The Properties screen appears. 4. Select Paper Size, Resolution, and Orientation. 5. Click OK to continue. 6. Enter the recipient's name. The Recipient's Information screen displays. 7. In the Recipient's Name field enter the Name and the Fax Number of the recipient. 8. Click Add to enter the contact in the Recipient's List as shown.
-
 1
1 -
2
-
3
-
4
-
5
-
6
-
7
-
8
-
9
-
10
-
11
-
12
-
13
-
14
-
15
-
16
-
17
-
18
-
19
-
20
-
21
-
22
-
23
-
24
-
25
-
26
-
27
-
28
-
29
-
30
-
31
-
32
-
33
-
34
-
35
-
36
-
37
-
38
-
39
-
40
-
41
-
42
-
43
-
44
-
45
-
46
-
47
-
48
-
49
-
50
-
51
-
52
-
53
-
54
-
55
-
56
-
57
-
58
-
59
-
60
-
61
-
62
-
63
-
64
-
65
-
66
-
67
-
68
-
69
-
70
-
71
-
72
-
 73
73 -
 74
74 -
 75
75 -
 76
76 -
 77
77 -
 78
78 -
 79
79 -
 80
80 -
 81
81 -
 82
82 -
 83
83 -
84
-
85
-
86
-
87
-
88
-
89
-
90
-
91
-
92
-
93
-
94
-
95
-
96
-
97
-
98
-
99
-
100
-
101
-
102
-
103
-
104
-
105
-
106
-
107
-
108
-
109
-
110
-
111
 |
 |
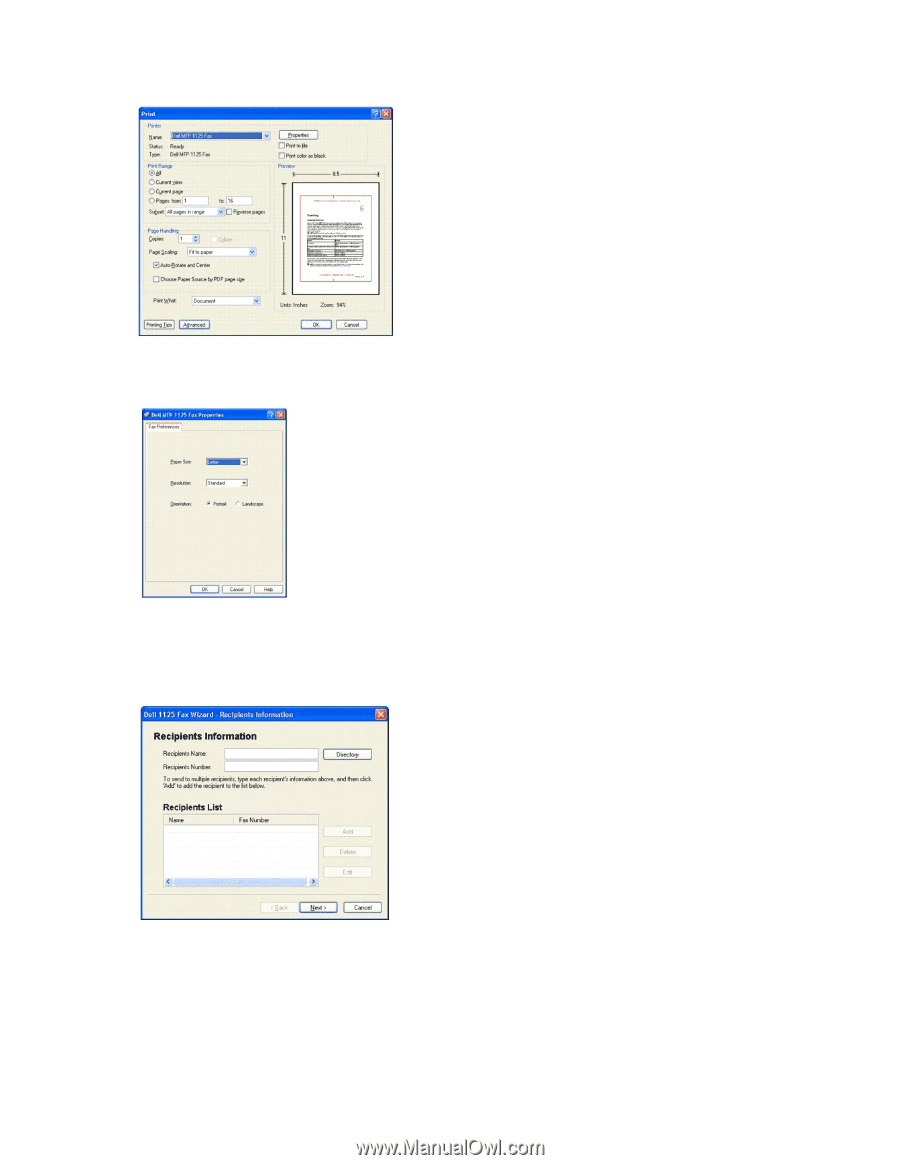
2.
In the Printer Name field, select
Dell MFP 1125 Fax
.
3.
Click the Properties button.
The Properties screen appears.
4.
Select Paper Size, Resolution, and Orientation.
5.
Click
OK
to continue.
6.
Enter the recipient's name.
The Recipient's Information screen displays.
7.
In the Recipient's Name field enter the Name and the Fax Number of the recipient.
8.
Click
Add
to enter the contact in the Recipient's List as shown.