Dell 1133 Mono Laser User's Guide (HTML) - Page 8
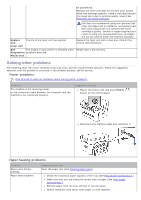
Solving other problems, Power problems, Paper feeding problems
 |
View all Dell 1133 Mono Laser manuals
Add to My Manuals
Save this manual to your list of manuals |
Page 8 highlights
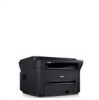
be guaranteed. Replace the toner cartridge for the best print quality when this message appears. Using a cartridge beyond this stage can result in printing quality issues (See Replacing the toner cartridge). Replace new Fuser unit The life of the fuser unit has expired. Self The engine in your printer is checking some Diagnostics problems detected. Please wait Dell does not recommend using non-genuine Dell toner cartridge such as refilled or remanufactured. Dell cannot guarantee non-genuine Dell toner cartridge's quality. Service or repair required as a result of using non-genuine Dell toner cartridges will not be covered under the machine warranty. Replace the fuser unit with a new one. Contact the service representatives. Please wait a few minutes. Solving other problems The following chart lists some conditions that may occur and the recommended solutions. Follow the suggested solutions until the problem is corrected. If the problem persists, call for service. Power problems Click this link to open an animation about solving power problems. Condition The machine is not receiving power, or the connection cable between the computer and the machine is not connected properly. Suggested solutions Plug in the power cord and press Power ( ) button on the control panel. Disconnect the machine cable and reconnect it. Paper feeding problems Condition Paper jams during printing. Paper sticks together. Suggested solutions Clear the paper jam (See Clearing paper jams). Check the maximum paper capacity of the tray (See Print media specifications ). Make sure that you are using the correct type of paper (See Print media specifications ). Remove paper from the tray and flex or fan the paper. Humid conditions may cause some paper to stick together.
-
 1
1 -
2
-
 3
3 -
 4
4 -
 5
5 -
 6
6 -
 7
7 -
 8
8 -
 9
9 -
 10
10 -
 11
11 -
 12
12 -
 13
13 -
14
-
15
-
16
-
17
-
18
-
19
-
20
-
21
-
22
-
23
-
24
-
25
-
26
-
27
-
28
-
29
-
30
-
31
-
32
-
33
-
34
-
35
-
36
-
37
-
38
-
39
-
40
-
41
-
42
-
43
-
44
-
45
-
46
-
47
-
48
-
49
-
50
-
51
-
52
-
53
-
54
-
55
-
56
-
57
-
58
-
59
-
60
-
61
-
62
-
63
-
64
-
65
-
66
-
67
-
68
-
69
-
70
-
71
-
72
-
73
-
74
-
75
-
76
-
77
-
78
-
79
-
80
-
81
-
82
-
83
-
84
-
85
-
86
-
87
-
88
 |
 |