Dell 1135N Service Manual - Page 98
Auto IP Run - printer cartridges
 |
View all Dell 1135N manuals
Add to My Manuals
Save this manual to your list of manuals |
Page 98 highlights
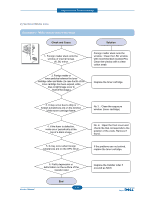
Alignment and Troubleshooting Message DHCP problem: Auto IP Run Document Jam. Remove Jam Door Open. Close it Error #02-000~2 Turn off then on Install Toner Install it Memory Full Remove Job Network Problem: IP Conflict Not Compatible Toner cartridge Output bin Full Remove paper Meaning Suggested solutions The IP address assignment is failed. Change the IP address assignment This happens, when Auto IP for DHCP method to BOOTP or Static. If you is not set in SyncThru Web Service. do not change this option, the DHCP server continually asks to assign the IP Address. The loaded original has jammed in the Open the ADF cover and clear the jam. ADF. The front cover is not securely latched. 1. Close the cover until it locks into place. 2. Enter the EDC mode and check the cover status. A fuser error has occurred. 1. Turn the printer off and back on to continue. 2. Reconnect the cable between the fuser and SMPS board. 3. Remove the fuser and re-install it. 4. Check the thermostat. If it is defective, replace it. 5. If error persists, replace the fuser. 6. If error persists, replace the SMPS/ HVPS board. The toner cartridge is installed improperly, or not installed. Reinstall the toner cartridge two or three times to confirm it is seated properly. If the problem persists, the toner cartridge is not being detected. The memory is full. Press the left/right arrow to highlight Cancel or Start, then press OK. If you select Cancel , the machine stops the fax job. If you select Start, the machine only sends scanned documents of the fax job. The IP address is used elsewhere. Check the IP address or obtain a new IP address. The indicated toner cartridge is not suitable for your machine. Install the corresponding toner cartridge with a Samsung-genuine cartridge. The output tray is full. Or the sensor is not facing down. Remove papers from the output tray, the machine resumes printing. Or make sure the sensor is facing down. Service Manual 4-25
-
 1
1 -
2
-
3
-
4
-
5
-
6
-
7
-
8
-
9
-
10
-
11
-
12
-
13
-
14
-
15
-
16
-
17
-
18
-
19
-
20
-
21
-
22
-
23
-
24
-
25
-
26
-
27
-
28
-
29
-
30
-
31
-
32
-
33
-
34
-
35
-
36
-
37
-
38
-
39
-
40
-
41
-
42
-
43
-
44
-
45
-
46
-
47
-
48
-
49
-
50
-
51
-
52
-
53
-
54
-
55
-
56
-
57
-
58
-
59
-
60
-
61
-
62
-
63
-
64
-
65
-
66
-
67
-
68
-
69
-
70
-
71
-
72
-
73
-
74
-
75
-
76
-
77
-
78
-
79
-
80
-
81
-
82
-
83
-
84
-
85
-
86
-
87
-
88
-
89
-
90
-
91
-
92
-
 93
93 -
 94
94 -
 95
95 -
 96
96 -
 97
97 -
 98
98 -
 99
99 -
 100
100 -
 101
101 -
 102
102 -
 103
103 -
104
-
105
-
106
-
107
-
108
-
109
-
110
-
111
-
112
-
113
-
114
-
115
-
116
-
117
-
118
-
119
-
120
-
121
-
122
-
123
-
124
-
125
-
126
-
127
-
128
-
129
-
130
-
131
-
132
-
133
-
134
-
135
-
136
-
137
-
138
-
139
-
140
-
141
-
142
-
143
-
144
-
145
-
146
-
147
-
148
-
149
-
150
-
151
-
152
-
153
-
154
-
155
-
156
-
157
-
158
-
159
-
160
-
161
-
162
-
163
-
164
-
165
-
166
-
167
-
168
-
169
 |
 |
