Dell 1135N Service Manual - Page 99
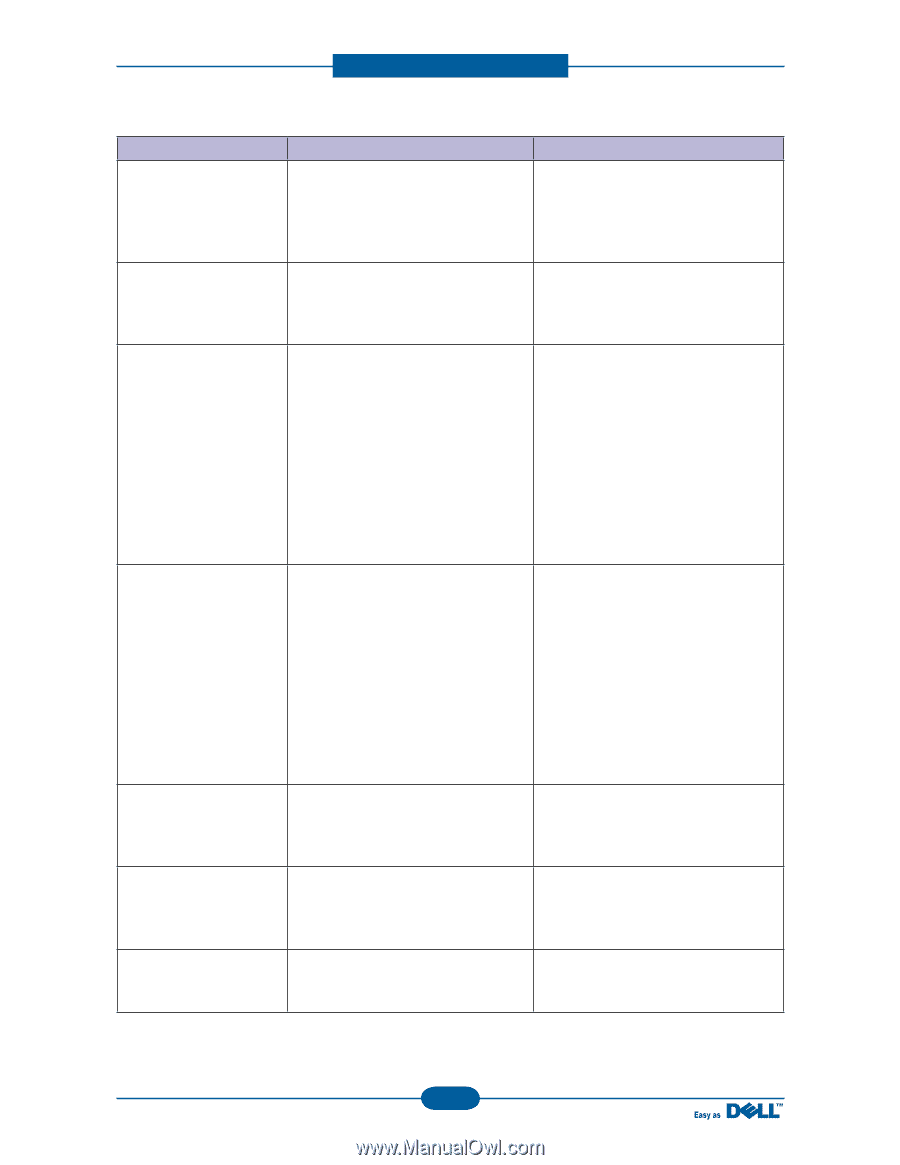
Message, Meaning, Suggested solutions, Paper Empty, in Tray1, Paper Jam, in exit area, in MP Tray, - prepare new cartridge
 |
View all Dell 1135N manuals
Add to My Manuals
Save this manual to your list of manuals |
Page 99 highlights
Alignment and Troubleshooting Message Paper Empty in Tray1 Paper Jam in exit area Paper Jam in MP Tray Paper Jam in Tray1 Paper Jam inside machine Prepare new cartridge Replace new cartridge Meaning Suggested solutions There is no paper in the indicated tray. 1. Load paper in the tray. 2. If the message does not clear, enter the EDC mode and check the empty sensor. Replace empty sensor if defective. Special print media has jammed in the 1. Clear the jam. paper exit area. 2. If the message does not clear, enter the EDC mode and check the exit sensor. Replace exit sensor. Paper has jammed in the manual tray area. 1. Clear the jam. 2. If the message does not clear, check the following. - If pick up roller does not rotate and paper does not feed, check the pick up clutch. 3. If Pickup roller is rotating but the paper is not feeding, replace the pick up rubber. 4. Check the feed sensor in EDC mode. If it is defective, replace it. Paper has jammed in the tray1 area. 1. Clear the jam. 2. If the message does not clear, check the following. - If pick up roller does not rotate and paper does not feed, check the pick up clutch. 3. If Pickup roller is rotating but the paper is not feeding, replace the pick up rubber. 4. Check the feed sensor in EDC mode. If it is defective, replace it. Paper has jammed inside the machine. 1. Clear the jam. 2. If the message does not clear, check the feed sensor or exit sensor. Replace the defective sensor. Small amount of toner is left in the indicated cartridge. The cartridge is getting low on toner. Prepare a new cartridge for a replacement. You may temporarily increase the printing quality by redistributing the toner. The cartridge is almost empty. Replace the toner cartridge for the best print quality when this message appears. Service Manual 4-26
-
 1
1 -
2
-
3
-
4
-
5
-
6
-
7
-
8
-
9
-
10
-
11
-
12
-
13
-
14
-
15
-
16
-
17
-
18
-
19
-
20
-
21
-
22
-
23
-
24
-
25
-
26
-
27
-
28
-
29
-
30
-
31
-
32
-
33
-
34
-
35
-
36
-
37
-
38
-
39
-
40
-
41
-
42
-
43
-
44
-
45
-
46
-
47
-
48
-
49
-
50
-
51
-
52
-
53
-
54
-
55
-
56
-
57
-
58
-
59
-
60
-
61
-
62
-
63
-
64
-
65
-
66
-
67
-
68
-
69
-
70
-
71
-
72
-
73
-
74
-
75
-
76
-
77
-
78
-
79
-
80
-
81
-
82
-
83
-
84
-
85
-
86
-
87
-
88
-
89
-
90
-
91
-
92
-
93
-
 94
94 -
 95
95 -
 96
96 -
 97
97 -
 98
98 -
 99
99 -
 100
100 -
 101
101 -
 102
102 -
 103
103 -
 104
104 -
105
-
106
-
107
-
108
-
109
-
110
-
111
-
112
-
113
-
114
-
115
-
116
-
117
-
118
-
119
-
120
-
121
-
122
-
123
-
124
-
125
-
126
-
127
-
128
-
129
-
130
-
131
-
132
-
133
-
134
-
135
-
136
-
137
-
138
-
139
-
140
-
141
-
142
-
143
-
144
-
145
-
146
-
147
-
148
-
149
-
150
-
151
-
152
-
153
-
154
-
155
-
156
-
157
-
158
-
159
-
160
-
161
-
162
-
163
-
164
-
165
-
166
-
167
-
168
-
169
 |
 |