Dell 3115cn Color Laser Printer Dell 3115cn User's Guide - Page 419

Print and Check the System Settings after SP1, or Windows Server
Page 419 highlights

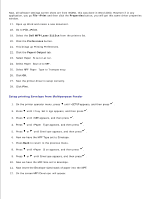
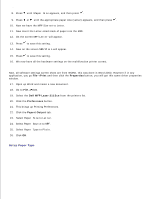
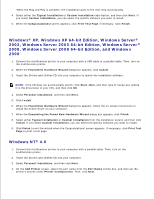
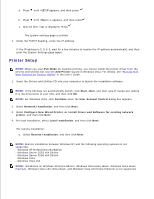
4. 5. Select either Typical Installation or Custom Installation from the installation wizard, and then click Install. If you select Custom Installation, you can select the specific software you want to install. 6. The Adobe License Agreement appears, click to accept the agreement and then click Install. 7. Click Finish to exit the wizard when the Congratulations! screen appears. USB Printing A local printer is a printer attached to your computer or a print server using a USB or parallel cable. If your multifunction printer is attached to a network and not your computer, see "Setup Network". Setup Network NOTE: To use this multifunction printer in a UNIX or Linux environment, you need to install a UX Filter or Linux Driver. For more information on how to install and use these, refer to your User's Guide. NOTE: When using a CD drive in a Linux environment, you need to mount the CD according to your system environment. The command strings are mount/media/cdrom. Disable Microsoft® Windows® XP, Windows Vista®, Windows Server® 2003 (after SP1) , or Windows Server® 2008 Firewall Before Printer Software Installation NOTE: This step may not be necessary if you have Windows XP Service Pack 2 installed. If your multifunction printer is connected directly to a network and the built-in operating system firewall is enabled, you cannot view your networked printer(s) when you run the Dell™ printer installation software. To prevent this situation, disable the built-in operating system firewall before you install the Dell printer software. To disable or enable your built-in operating system firewall, perform the following steps: NOTICE: Dell recommends that you enable your built-in operating system firewall after you install the printer software. Enabling the built-in operating system firewall after you install the printer software does not limit the use of your network printer. 1. Click the Start button and click Help and Support. 2. In the Search box, type firewall and then click the green arrow. 3. In the Pick a Task list, click Enable or disable Internet Connection Firewall and then follow the instructions on the screen. Print and Check the System Settings Page 1. Print the System Settings page. a.

  • 1
  • 2
  • 3
  • 4
  • 5
  • 6
  • 7
  • 8
  • 9
  • 10
  • 11
  • 12
  • 13
  • 14
  • 15
  • 16
  • 17
  • 18
  • 19
  • 20
  • 21
  • 22
  • 23
  • 24
  • 25
  • 26
  • 27
  • 28
  • 29
  • 30
  • 31
  • 32
  • 33
  • 34
  • 35
  • 36
  • 37
  • 38
  • 39
  • 40
  • 41
  • 42
  • 43
  • 44
  • 45
  • 46
  • 47
  • 48
  • 49
  • 50
  • 51
  • 52
  • 53
  • 54
  • 55
  • 56
  • 57
  • 58
  • 59
  • 60
  • 61
  • 62
  • 63
  • 64
  • 65
  • 66
  • 67
  • 68
  • 69
  • 70
  • 71
  • 72
  • 73
  • 74
  • 75
  • 76
  • 77
  • 78
  • 79
  • 80
  • 81
  • 82
  • 83
  • 84
  • 85
  • 86
  • 87
  • 88
  • 89
  • 90
  • 91
  • 92
  • 93
  • 94
  • 95
  • 96
  • 97
  • 98
  • 99
  • 100
  • 101
  • 102
  • 103
  • 104
  • 105
  • 106
  • 107
  • 108
  • 109
  • 110
  • 111
  • 112
  • 113
  • 114
  • 115
  • 116
  • 117
  • 118
  • 119
  • 120
  • 121
  • 122
  • 123
  • 124
  • 125
  • 126
  • 127
  • 128
  • 129
  • 130
  • 131
  • 132
  • 133
  • 134
  • 135
  • 136
  • 137
  • 138
  • 139
  • 140
  • 141
  • 142
  • 143
  • 144
  • 145
  • 146
  • 147
  • 148
  • 149
  • 150
  • 151
  • 152
  • 153
  • 154
  • 155
  • 156
  • 157
  • 158
  • 159
  • 160
  • 161
  • 162
  • 163
  • 164
  • 165
  • 166
  • 167
  • 168
  • 169
  • 170
  • 171
  • 172
  • 173
  • 174
  • 175
  • 176
  • 177
  • 178
  • 179
  • 180
  • 181
  • 182
  • 183
  • 184
  • 185
  • 186
  • 187
  • 188
  • 189
  • 190
  • 191
  • 192
  • 193
  • 194
  • 195
  • 196
  • 197
  • 198
  • 199
  • 200
  • 201
  • 202
  • 203
  • 204
  • 205
  • 206
  • 207
  • 208
  • 209
  • 210
  • 211
  • 212
  • 213
  • 214
  • 215
  • 216
  • 217
  • 218
  • 219
  • 220
  • 221
  • 222
  • 223
  • 224
  • 225
  • 226
  • 227
  • 228
  • 229
  • 230
  • 231
  • 232
  • 233
  • 234
  • 235
  • 236
  • 237
  • 238
  • 239
  • 240
  • 241
  • 242
  • 243
  • 244
  • 245
  • 246
  • 247
  • 248
  • 249
  • 250
  • 251
  • 252
  • 253
  • 254
  • 255
  • 256
  • 257
  • 258
  • 259
  • 260
  • 261
  • 262
  • 263
  • 264
  • 265
  • 266
  • 267
  • 268
  • 269
  • 270
  • 271
  • 272
  • 273
  • 274
  • 275
  • 276
  • 277
  • 278
  • 279
  • 280
  • 281
  • 282
  • 283
  • 284
  • 285
  • 286
  • 287
  • 288
  • 289
  • 290
  • 291
  • 292
  • 293
  • 294
  • 295
  • 296
  • 297
  • 298
  • 299
  • 300
  • 301
  • 302
  • 303
  • 304
  • 305
  • 306
  • 307
  • 308
  • 309
  • 310
  • 311
  • 312
  • 313
  • 314
  • 315
  • 316
  • 317
  • 318
  • 319
  • 320
  • 321
  • 322
  • 323
  • 324
  • 325
  • 326
  • 327
  • 328
  • 329
  • 330
  • 331
  • 332
  • 333
  • 334
  • 335
  • 336
  • 337
  • 338
  • 339
  • 340
  • 341
  • 342
  • 343
  • 344
  • 345
  • 346
  • 347
  • 348
  • 349
  • 350
  • 351
  • 352
  • 353
  • 354
  • 355
  • 356
  • 357
  • 358
  • 359
  • 360
  • 361
  • 362
  • 363
  • 364
  • 365
  • 366
  • 367
  • 368
  • 369
  • 370
  • 371
  • 372
  • 373
  • 374
  • 375
  • 376
  • 377
  • 378
  • 379
  • 380
  • 381
  • 382
  • 383
  • 384
  • 385
  • 386
  • 387
  • 388
  • 389
  • 390
  • 391
  • 392
  • 393
  • 394
  • 395
  • 396
  • 397
  • 398
  • 399
  • 400
  • 401
  • 402
  • 403
  • 404
  • 405
  • 406
  • 407
  • 408
  • 409
  • 410
  • 411
  • 412
  • 413
  • 414
  • 415
  • 416
  • 417
  • 418
  • 419
  • 420
  • 421
  • 422
  • 423
  • 424
  • 425
  • 426
  • 427
  • 428
  • 429
  • 430
  • 431
  • 432
  • 433
  • 434
  • 435
  • 436
  • 437
  • 438
  • 439
  • 440
  • 441
  • 442
  • 443
  • 444
  • 445
  • 446
  • 447
  • 448
  • 449
  • 450
  • 451
  • 452
  • 453
  • 454
  • 455
  • 456
  • 457
  • 458
  • 459
  • 460
  • 461
  • 462
  • 463
  • 464
  • 465
  • 466
  • 467
  • 468
  • 469
  • 470
  • 471
  • 472
  • 473
  • 474
  • 475
  • 476
  • 477
  • 478
  • 479
  • 480
  • 481
  • 482
  • 483
  • 484
  • 485
  • 486
  • 487
  • 488
  • 489
  • 490
  • 491
  • 492
  • 493
  • 494
  • 495
  • 496
  • 497
  • 498
  • 499
  • 500
  • 501
  • 502
  • 503
  • 504
  • 505
  • 506
  • 507
  • 508
  • 509
  • 510
  • 511
  • 512
  • 513
  • 514
  • 515
  • 516
  • 517
  • 518
  • 519
  • 520
  • 521
  • 522
  • 523
  • 524
  • 525
  • 526
  • 527
  • 528
  • 529
  • 530
  • 531
  • 532
  • 533
  • 534
  • 535
  • 536
  • 537
  • 538
  • 539
  • 540
  • 541
  • 542
  • 543
  • 544
  • 545
  • 546
  • 547
  • 548
  • 549
  • 550
  • 551
  • 552
  • 553
  • 554
  • 555
  • 556
  • 557
  • 558
  • 559
  • 560
  • 561
  • 562
  • 563
  • 564
  • 565
  • 566
  • 567
  • 568
  • 569
  • 570
  • 571
  • 572
  • 573
  • 574
  • 575
  • 576
  • 577
  • 578
  • 579
  • 580
  • 581
  • 582
  • 583
  • 584
  • 585
  • 586
  • 587
  • 588
  • 589
  • 590
  • 591
  • 592
  • 593
  • 594
  • 595
  • 596
  • 597
  • 598
  • 599
  • 600
  • 601
  • 602
  • 603
  • 604
  • 605
  • 606
  • 607
  • 608
  • 609
  • 610
  • 611
  • 612
  • 613
  • 614
  • 615
  • 616
  • 617
  • 618
  • 619
  • 620
  • 621
  • 622
  • 623
  • 624
  • 625
  • 626
  • 627
  • 628
  • 629
  • 630
  • 631
  • 632
  • 633
  • 634

Select either
Typical Installation
or
Custom Installation
from the installation wizard, and then click
Install
. If you select
Custom Installation
, you can select the specific software you want to install.
5.
The Adobe License Agreement appears, click to accept the agreement and then click
Install
.
6.
Click
Finish
to exit the wizard when the Congratulations! screen appears.
7.
USB Printing
A local printer is a printer attached to your computer or a print server using a USB or parallel cable. If your
multifunction printer is attached to a network and not your computer, see "
Setup Network
".
Setup Network
NOTE:
To use this multifunction printer in a UNIX or Linux environment, you need to install a UX Filter
or Linux Driver. For more information on how to install and use these, refer to your User's Guide.
NOTE:
When using a CD drive in a Linux environment, you need to mount the CD according to your
system environment. The command strings are mount/media/cdrom.
Disable Microsoft
®
Windows
®
XP, Windows Vista
®
, Windows
Server
®
2003 (after SP1) , or Windows Server
®
2008 Firewall
Before Printer Software Installation
NOTE:
This step may not be necessary if you have Windows XP Service Pack 2 installed.
If your multifunction printer is connected directly to a network and the built-in operating system firewall is
enabled, you cannot view your networked printer(s) when you run the Dell™ printer installation software. To
prevent this situation, disable the built-in operating system firewall before you install the Dell printer
software. To disable or enable your built-in operating system firewall, perform the following steps:
NOTICE:
Dell recommends that you enable your built-in operating system firewall after you install
the printer software. Enabling the built-in operating system firewall after you install the printer
software does not limit the use of your network printer.
Click the
Start
button and click
Help and Support
.
1.
In the
Search
box, type firewall and then click the green arrow.
2.
In the
Pick a Task
list, click
Enable or disable Internet Connection Firewall
and then follow the
instructions on the screen.
3.
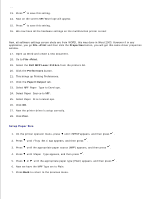
Print and Check the System Settings Page
Print the System Settings page.
a.
1.