Dell 3400MP Owner's Manual - Page 15
Using the Control Panel - video projector
 |
View all Dell 3400MP manuals
Add to My Manuals
Save this manual to your list of manuals |
Page 15 highlights
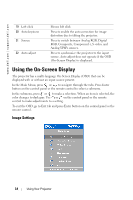
Using the Control Panel 1 Power 2 Source 3 Keystone adjustment 4 Resync 5 Menu Turn the projector on and off. For more information, see "Turning Your Projector On" on page 11 and "Turning Your Projector Off" on page 11. Press to toggle through Analog RGB, Composite, Component-i, S-video, and Analog YPbPr sources when multiple sources are connected to the projector. Press to adjust image distortion caused by tilting the projector. (±16 degrees) Press to synchronize the projector to the input source. Resync does not operate if the on-screen display (OSD) is displayed. Press to activate the OSD. Use the directional keys and Menu button to navigate through the OSD. Using Your Projector 15
-
 1
1 -
2
-
3
-
4
-
5
-
6
-
7
-
8
-
9
-
 10
10 -
 11
11 -
 12
12 -
 13
13 -
 14
14 -
 15
15 -
 16
16 -
 17
17 -
 18
18 -
 19
19 -
 20
20 -
21
-
22
-
23
-
24
-
25
-
26
-
27
-
28
-
29
-
30
-
31
-
32
-
33
-
34
-
35
-
36
-
37
-
38
-
39
-
40
-
41
-
42
-
43
-
44
-
45
-
46
-
47
-
48
-
49
-
50
-
51
-
52
-
53
-
54
-
55
-
56
-
57
-
58
-
59
-
60
-
61
-
62
-
63
-
64
-
65
-
66
-
67
-
68
-
69
-
70
-
71
-
72
-
73
-
74
-
75
-
76
-
77
-
78
-
79
-
80
-
81
-
82
-
83
-
84
-
85
-
86
-
87
-
88
-
89
-
90
-
91
-
92
-
93
-
94
-
95
-
96
-
97
-
98
-
99
-
100
-
101
-
102
-
103
-
104
-
105
-
106
-
107
-
108
-
109
-
110
-
111
-
112
-
113
-
114
-
115
-
116
-
117
-
118
-
119
-
120
-
121
-
122
-
123
-
124
-
125
-
126
-
127
-
128
-
129
-
130
-
131
-
132
-
133
-
134
-
135
-
136
-
137
-
138
-
139
-
140
-
141
-
142
-
143
-
144
-
145
-
146
-
147
-
148
-
149
-
150
-
151
-
152
-
153
-
154
-
155
-
156
-
157
-
158
-
159
-
160
-
161
-
162
-
163
-
164
-
165
-
166
-
167
-
168
-
169
-
170
-
171
-
172
-
173
-
174
-
175
-
176
-
177
-
178
-
179
-
180
-
181
-
182
-
183
-
184
-
185
-
186
-
187
-
188
-
189
-
190
-
191
-
192
-
193
-
194
-
195
-
196
-
197
-
198
-
199
-
200
-
201
-
202
-
203
-
204
-
205
-
206
-
207
-
208
-
209
-
210
-
211
-
212
-
213
-
214
-
215
-
216
-
217
-
218
-
219
-
220
-
221
-
222
-
223
-
224
-
225
-
226
-
227
-
228
-
229
-
230
-
231
-
232
-
233
-
234
-
235
-
236
-
237
-
238
-
239
-
240
-
241
-
242
-
243
-
244
-
245
-
246
-
247
-
248
-
249
-
250
-
251
-
252
-
253
-
254
-
255
-
256
-
257
-
258
-
259
-
260
-
261
-
262
-
263
-
264
-
265
-
266
-
267
-
268
-
269
-
270
-
271
-
272
-
273
-
274
-
275
-
276
-
277
-
278
-
279
-
280
-
281
-
282
-
283
-
284
-
285
-
286
-
287
-
288
-
289
-
290
-
291
-
292
 |
 |
Using Your Projector
15
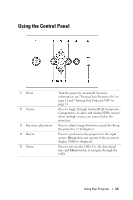
Using the Control Panel
1
Power
Turn the projector on and off. For more
information, see "Turning Your Projector On" on
page11 and "Turning Your Projector Off" on
page 11.
2
Source
Press to toggle through Analog RGB, Composite,
Component-i, S-video, and Analog YPbPr sources
when multiple sources are connected to the
projector.
3
Keystone adjustment
Press to adjust image distortion caused by tilting
the projector. (±16 degrees)
4
Resync
Press to synchronize the projector to the input
source.
Resync
does not operate if the on-screen
display (OSD) is displayed.
5
Menu
Press to activate the OSD. Use the directional
keys and
Menu
button to navigate through the
OSD.