Dell 3400MP Owner's Manual - Page 22
Computer Source Menu, Video Source Menu, sharpness
 |
View all Dell 3400MP manuals
Add to My Manuals
Save this manual to your list of manuals |
Page 22 highlights
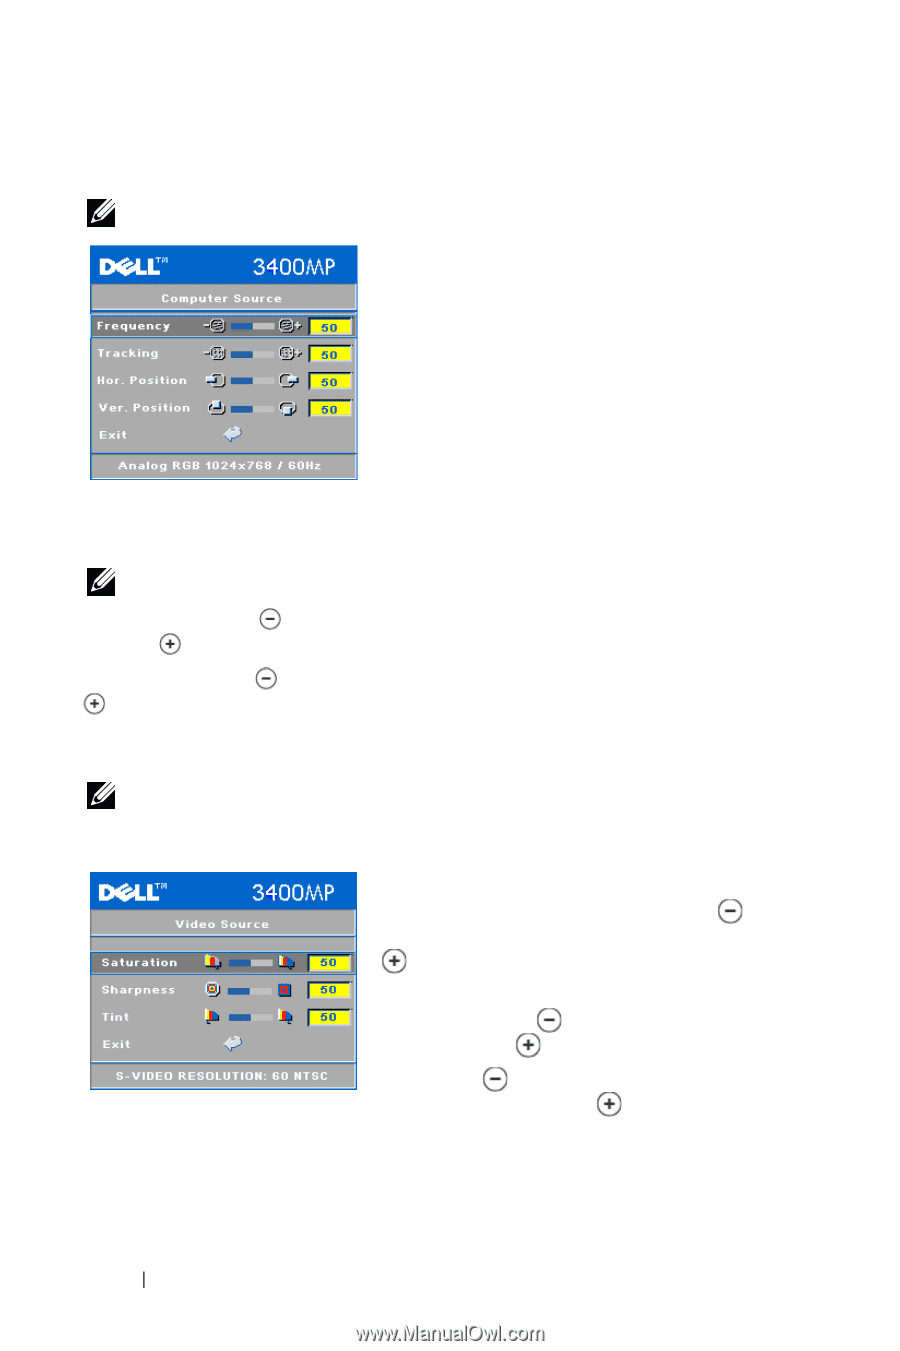
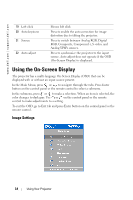
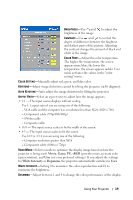
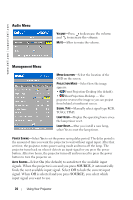
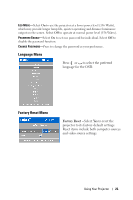
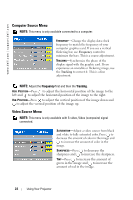
www.dell.com | support.dell.com Computer Source Menu NOTE: This menu is only available connected to a computer. FREQUENCY-Change the display data clock frequency to match the frequency of your computer graphics card. If you see a vertical flickering bar, use Frequency control to minimize the bars. This is a coarse adjustment. TRACKING-Synchronize the phase of the display signal with the graphic card. If you experience an unstable or flickering image, use the Tracking to correct it. This is a fine adjustment. NOTE: Adjust the Frequency first and then the Tracking. HOR. POSITION-Press to adjust the horizontal position of the image to the left and to adjust the horizontal position of the image to the right. VER. POSITION-Press to adjust the vertical position of the image down and to adjust the vertical position of the image up. Video Source Menu NOTE: This menu is only available with S-video, Video (composite) signal connected. SATURATION-Adjust a video source from black and white to fully saturated color. Press to decrease the amount of color in the image and to increase the amount of color in the image. SHARPNESS-Press to decrease the sharpness and to increase the sharpness. TINT-Press to increase the amount of green in the image and to increase the amount of red in the image. 22 Using Your Projector
-
 1
1 -
2
-
3
-
4
-
5
-
6
-
7
-
8
-
9
-
10
-
11
-
12
-
13
-
14
-
15
-
16
-
 17
17 -
 18
18 -
 19
19 -
 20
20 -
 21
21 -
 22
22 -
 23
23 -
 24
24 -
 25
25 -
 26
26 -
 27
27 -
28
-
29
-
30
-
31
-
32
-
33
-
34
-
35
-
36
-
37
-
38
-
39
-
40
-
41
-
42
-
43
-
44
-
45
-
46
-
47
-
48
-
49
-
50
-
51
-
52
-
53
-
54
-
55
-
56
-
57
-
58
-
59
-
60
-
61
-
62
-
63
-
64
-
65
-
66
-
67
-
68
-
69
-
70
-
71
-
72
-
73
-
74
-
75
-
76
-
77
-
78
-
79
-
80
-
81
-
82
-
83
-
84
-
85
-
86
-
87
-
88
-
89
-
90
-
91
-
92
-
93
-
94
-
95
-
96
-
97
-
98
-
99
-
100
-
101
-
102
-
103
-
104
-
105
-
106
-
107
-
108
-
109
-
110
-
111
-
112
-
113
-
114
-
115
-
116
-
117
-
118
-
119
-
120
-
121
-
122
-
123
-
124
-
125
-
126
-
127
-
128
-
129
-
130
-
131
-
132
-
133
-
134
-
135
-
136
-
137
-
138
-
139
-
140
-
141
-
142
-
143
-
144
-
145
-
146
-
147
-
148
-
149
-
150
-
151
-
152
-
153
-
154
-
155
-
156
-
157
-
158
-
159
-
160
-
161
-
162
-
163
-
164
-
165
-
166
-
167
-
168
-
169
-
170
-
171
-
172
-
173
-
174
-
175
-
176
-
177
-
178
-
179
-
180
-
181
-
182
-
183
-
184
-
185
-
186
-
187
-
188
-
189
-
190
-
191
-
192
-
193
-
194
-
195
-
196
-
197
-
198
-
199
-
200
-
201
-
202
-
203
-
204
-
205
-
206
-
207
-
208
-
209
-
210
-
211
-
212
-
213
-
214
-
215
-
216
-
217
-
218
-
219
-
220
-
221
-
222
-
223
-
224
-
225
-
226
-
227
-
228
-
229
-
230
-
231
-
232
-
233
-
234
-
235
-
236
-
237
-
238
-
239
-
240
-
241
-
242
-
243
-
244
-
245
-
246
-
247
-
248
-
249
-
250
-
251
-
252
-
253
-
254
-
255
-
256
-
257
-
258
-
259
-
260
-
261
-
262
-
263
-
264
-
265
-
266
-
267
-
268
-
269
-
270
-
271
-
272
-
273
-
274
-
275
-
276
-
277
-
278
-
279
-
280
-
281
-
282
-
283
-
284
-
285
-
286
-
287
-
288
-
289
-
290
-
291
-
292
 |
 |