Dell 725 Personal Inkjet Printer User's Guide - Page 4
About Your Printer, Understanding the Printer Parts, Setting Up Your Printer - cartridges
 |
View all Dell 725 Personal Inkjet Printer manuals
Add to My Manuals
Save this manual to your list of manuals |
Page 4 highlights
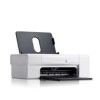
About Your Printer Understanding the Printer Parts Setting Up Your Printer Understanding the Software Understanding the Printer Parts Part: Description: 1 Paper support Part that supports loaded paper. 2 Paper guide Guide that helps the paper feed into the printer properly. 3 Front cover Cover you lift to gain access to the ink cartridge or to clear a paper jam. 4 Paper exit tray Tray that holds the paper as it exits the printer. NOTE: To extend the paper exit tray, pull the tray straight out. 5 Paper feed button Button you press to feed paper through the printer. 6 Power button Button you press to power the printer on and off. 7 USB connector Slot into which you plug the USB cable (sold separately). The other end of the USB cable plugs into your computer. 8 Power connector Slot into which you plug the power cable. NOTE: Insert the power cable into the printer before connecting the power cable into the wall outlet. Setting Up Your Printer
-
 1
1 -
 2
2 -
 3
3 -
 4
4 -
 5
5 -
 6
6 -
 7
7 -
 8
8 -
 9
9 -
 10
10 -
11
-
12
-
13
-
14
-
15
-
16
-
17
-
18
-
19
-
20
-
21
-
22
-
23
-
24
-
25
-
26
-
27
-
28
-
29
-
30
-
31
-
32
-
33
-
34
-
35
-
36
-
37
-
38
-
39
-
40
-
41
-
42
-
43
-
44
-
45
-
46
-
47
-
48
-
49
-
50
-
51
-
52
-
53
-
54
-
55
-
56
-
57
-
58
-
59
 |
 |
