Dell 968w All In One Wireless Photo Printer User's Guide - Page 45
Photo, Select, Photo Preview, Arrow, Start, Photo Proof Sheet, Print All Photos, Slideshow, Save
 |
View all Dell 968w All In One Wireless Photo Printer manuals
Add to My Manuals
Save this manual to your list of manuals |
Page 45 highlights
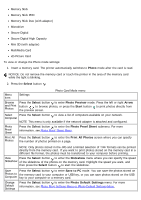
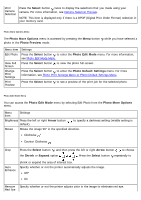
Memory Stick Memory Stick PRO Memory Stick Duo (with adapter) Microdrive Secure Digital Secure Digital High Capacity Mini SD (with adapter) MultiMedia Card xD-Picture Card To view or change the Photo mode settings: 1. Insert a memory card. The printer automatically switches to Photo mode after the card is read. NOTICE: Do not remove the memory card or touch the printer in the area of the memory card while the light is blinking. 2. Press the Select button . Menu item Settings Photo Card Mode menu Browse Press the Select button to enter Photo Preview mode. Press the left or right Arrow and Print button to browse photos, or press the Start button to print photos directly from Photos the preview screen. Select Press the Select button to view a list of computers available on your network. Computer NOTE: This menu is only available if the network adapter is attached and configured. Photo Proof Sheet Press the Select button to enter the Photo Proof Sheet submenu. For more information, see Photo Proof Sheet Menu. Print All Press the Select button to enter the Print All Photos screen where you can specify Photos the number of photos printed on a page. NOTE: Only photos stored in the JPG and a limited selection of TIFF formats can be printed directly from the memory card. If you want to print photos stored on the memory card in a different file format, the photos must be transferred to your computer before printing. View Press the Select button to enter the Slideshow menu where you can specify the speed Slideshow of the slideshow of the photos on the memory card. Highlight the speed you want, and then press the Select button to start the slideshow. Save Press the Select button to enter Save to PC mode. You can save the photos stored on Photos to the memory card to your computer or USB key, or you can save photos stored on the USB Computer key to your computer or a memory card. Change Default Settings Press the Select button to enter the Photo Default Settings menu. For more information, see Photo Print Settings Menu or Photo Default Settings Menu.
-
 1
1 -
2
-
3
-
4
-
5
-
6
-
7
-
8
-
9
-
10
-
11
-
12
-
13
-
14
-
15
-
16
-
17
-
18
-
19
-
20
-
21
-
22
-
23
-
24
-
25
-
26
-
27
-
28
-
29
-
30
-
31
-
32
-
33
-
34
-
35
-
36
-
37
-
38
-
39
-
 40
40 -
 41
41 -
 42
42 -
 43
43 -
 44
44 -
 45
45 -
 46
46 -
 47
47 -
 48
48 -
 49
49 -
 50
50 -
51
-
52
-
53
-
54
-
55
-
56
-
57
-
58
-
59
-
60
-
61
-
62
-
63
-
64
-
65
-
66
-
67
-
68
-
69
-
70
-
71
-
72
-
73
-
74
-
75
-
76
-
77
-
78
-
79
-
80
-
81
-
82
-
83
-
84
-
85
-
86
-
87
-
88
-
89
-
90
-
91
-
92
-
93
-
94
-
95
-
96
-
97
-
98
-
99
-
100
-
101
-
102
-
103
-
104
-
105
-
106
-
107
-
108
-
109
-
110
-
111
-
112
-
113
-
114
-
115
-
116
-
117
-
118
-
119
-
120
-
121
-
122
-
123
-
124
-
125
-
126
-
127
-
128
-
129
-
130
-
131
-
132
-
133
-
134
-
135
-
136
-
137
-
138
-
139
-
140
-
141
-
142
-
143
-
144
-
145
-
146
-
147
-
148
-
149
-
150
-
151
-
152
-
153
-
154
-
155
-
156
-
157
-
158
-
159
-
160
-
161
-
162
-
163
-
164
-
165
-
166
-
167
-
168
-
169
-
170
-
171
-
172
-
173
-
174
-
175
-
176
-
177
-
178
-
179
-
180
-
181
 |
 |