Dell Brocade 300 Web Tools Administrator's Guide v7.1.0 - Page 154
Viewing detailed fan hardware status, Viewing the temperature status, Fan No, AirFlow Direction
 |
View all Dell Brocade 300 manuals
Add to My Manuals
Save this manual to your list of manuals |
Page 154 highlights
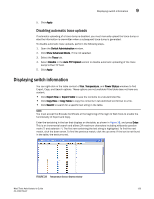
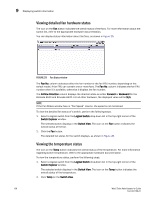
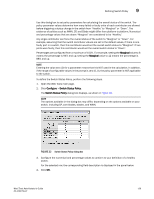
9 Displaying switch information Viewing detailed fan hardware status The icon on the Fan button indicates the overall status of the fans. For more information about the switch fan, refer to the appropriate hardware documentation. You can display status information about the fans, as shown in Figure 29. FIGURE 29 Fan States window The Fan No. column indicates either the fan number or the fan FRU number, depending on the switch model. A fan FRU can contain one or more fans. The Fan No. column indicates the fan FRU number when it is available, otherwise it displays the fan number. The AirFlow Direction column displays the direction state as either Forward or Backward for the Brocade 6510 and Brocade 6520. For all other hardware, the displayed value will be N/A. NOTE If the Fan States window has no "Fan Speed" column, the speed is not monitored. To view the detailed fan status of a switch, perform the following steps. 1. Select a logical switch from the Logical Switch drop-down list in the top-right corner of the Switch Explorer window. The selected switch displays in the Switch View. The icon on the Fan button indicates the overall status of the fan. 2. Click the Fan button. The detailed fan status for the switch displays, as shown in Figure 29. Viewing the temperature status The icon on the Temp button indicates the overall status of the temperature. For more information regarding switch temperature, refer to the appropriate hardware documentation. To view the temperature status, perform the following steps. 1. Select a logical switch from the Logical Switch drop-down list in the top-right corner of the Switch Explorer window. The selected switch displays in the Switch View. The icon on the Temp button indicates the overall status of the temperature. 2. Click Temp on the Switch View. 126 Web Tools Administrator's Guide 53-1002756-01
-
 1
1 -
2
-
3
-
4
-
5
-
6
-
7
-
8
-
9
-
10
-
11
-
12
-
13
-
14
-
15
-
16
-
17
-
18
-
19
-
20
-
21
-
22
-
23
-
24
-
25
-
26
-
27
-
28
-
29
-
30
-
31
-
32
-
33
-
34
-
35
-
36
-
37
-
38
-
39
-
40
-
41
-
42
-
43
-
44
-
45
-
46
-
47
-
48
-
49
-
50
-
51
-
52
-
53
-
54
-
55
-
56
-
57
-
58
-
59
-
60
-
61
-
62
-
63
-
64
-
65
-
66
-
67
-
68
-
69
-
70
-
71
-
72
-
73
-
74
-
75
-
76
-
77
-
78
-
79
-
80
-
81
-
82
-
83
-
84
-
85
-
86
-
87
-
88
-
89
-
90
-
91
-
92
-
93
-
94
-
95
-
96
-
97
-
98
-
99
-
100
-
101
-
102
-
103
-
104
-
105
-
106
-
107
-
108
-
109
-
110
-
111
-
112
-
113
-
114
-
115
-
116
-
117
-
118
-
119
-
120
-
121
-
122
-
123
-
124
-
125
-
126
-
127
-
128
-
129
-
130
-
131
-
132
-
133
-
134
-
135
-
136
-
137
-
138
-
139
-
140
-
141
-
142
-
143
-
144
-
145
-
146
-
147
-
148
-
 149
149 -
 150
150 -
 151
151 -
 152
152 -
 153
153 -
 154
154 -
 155
155 -
 156
156 -
 157
157 -
 158
158 -
 159
159 -
160
-
161
-
162
-
163
-
164
-
165
-
166
-
167
-
168
-
169
-
170
-
171
-
172
-
173
-
174
-
175
-
176
-
177
-
178
-
179
-
180
-
181
-
182
-
183
-
184
-
185
-
186
-
187
-
188
-
189
-
190
-
191
-
192
-
193
-
194
-
195
-
196
-
197
-
198
-
199
-
200
-
201
-
202
-
203
-
204
-
205
-
206
-
207
-
208
-
209
-
210
-
211
-
212
-
213
-
214
-
215
-
216
-
217
-
218
-
219
-
220
-
221
-
222
-
223
-
224
-
225
-
226
-
227
-
228
-
229
-
230
-
231
-
232
-
233
-
234
-
235
-
236
-
237
-
238
-
239
-
240
-
241
-
242
-
243
-
244
-
245
-
246
-
247
-
248
-
249
-
250
-
251
-
252
-
253
-
254
-
255
-
256
-
257
-
258
-
259
-
260
-
261
-
262
-
263
-
264
-
265
-
266
-
267
-
268
 |
 |
