Dell Dimension 4600 Owner's Manual - Page 69
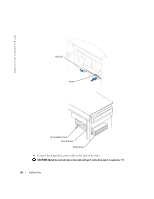
Secure the floppy drive bracket with the top bracket screw that came with your drive. - cooling fan
 |
View all Dell Dimension 4600 manuals
Add to My Manuals
Save this manual to your list of manuals |
Page 69 highlights
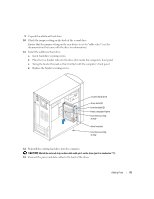
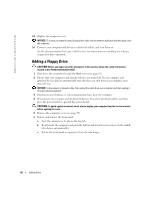
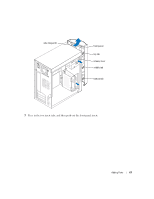
9 Connect the data cable to the back of the drive and to the floppy drive connector on the system board (see page 58). 10 Position the top of the floppy drive bracket so that it is completely flush with the bottom of the upper drive bay, and then slide the floppy drive bracket forward into position. NOTE: The top of the floppy drive bracket has two slots that fit into two clips on the bottom of the upper drive bay. When the floppy drive bracket is properly mounted, it remains in place without support. 11 Secure the floppy drive bracket with the top bracket screw that came with your drive. 12 Reattach the front panel to the side hinges, and then rotate it until it snaps onto the front of the computer. side hinges (3) front panel 13 Check all cable connections, and fold cables out of the way to provide airflow for the fan and cooling vents. 14 Replace the computer cover (see page 78). NOTICE: To connect a network cable, first plug the cable into the network wall jack and then plug it into the computer. Adding Parts 69
-
 1
1 -
2
-
3
-
4
-
5
-
6
-
7
-
8
-
9
-
10
-
11
-
12
-
13
-
14
-
15
-
16
-
17
-
18
-
19
-
20
-
21
-
22
-
23
-
24
-
25
-
26
-
27
-
28
-
29
-
30
-
31
-
32
-
33
-
34
-
35
-
36
-
37
-
38
-
39
-
40
-
41
-
42
-
43
-
44
-
45
-
46
-
47
-
48
-
49
-
50
-
51
-
52
-
53
-
54
-
55
-
56
-
57
-
58
-
59
-
60
-
61
-
62
-
63
-
 64
64 -
 65
65 -
 66
66 -
 67
67 -
 68
68 -
 69
69 -
 70
70 -
 71
71 -
 72
72 -
 73
73 -
 74
74 -
75
-
76
-
77
-
78
-
79
-
80
-
81
-
82
-
83
-
84
-
85
-
86
-
87
-
88
-
89
-
90
-
91
-
92
-
93
-
94
-
95
-
96
-
97
-
98
-
99
-
100
-
101
-
102
-
103
-
104
-
105
-
106
-
107
-
108
-
109
-
110
 |
 |
