Dell Dimension 900 Reference Guide - Page 33
Installing Expansion Cards, Interrupt request IRQ
 |
View all Dell Dimension 900 manuals
Add to My Manuals
Save this manual to your list of manuals |
Page 33 highlights
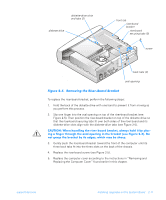
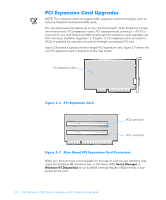
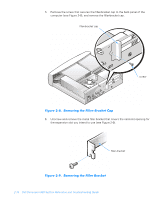
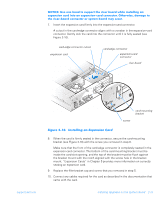
To check for an IRQ line in the Microsoft Windows 98 or Windows Me operating system, perform the following steps: 1. Click the Start button, point to Settings, and click Control Panel. 2. Double-click the System icon. 3. Click the Device Manager tab. 4. Double-click the Computer icon to open the Computer Properties window and view the View Resources tab. To check for an IRQ line in the Microsoft Windows 2000 operating system, perform the following steps: 1. Click the Start button, point to Settings, and click Control Panel. 2. Double-click the System icon. 3. Click the Hardware tab. 4. Click Device Manager. 5. Click View, and then click Resources by connection. 6. Double-click Interrupt request (IRQ) to view the IRQ assignments. To check for an IRQ line in the Microsoft Windows NT operating system, start the Windows NT Diagnostics in the Administrative Tools (Common) folder and view the Resources tab. NOTE: If an IRQ supported by your card is not available, try reassigning resources used by other devices or disabling unused devices. Installing Expansion Cards 1. Prepare the expansion card for installation as instructed in the documentation that came with the expansion card. Check the documentation to make sure the card is configured to work with other devices already installed in your computer. 2. Remove the computer cover according to the instructions in "Removing and Replacing the Computer Cover" found earlier in this chapter. 3. Remove the riser-board bracket according to the instructions in "Removing and Replacing the Riser-Board Bracket" found earlier in this chapter. 4. Choose an expansion-card connector for the card. NOTE: The PCI1 connector (see Figure 2-7) is reserved for use with Dimension 900 system-specific expansion cards available only from Dell (see "Available Upgrades" in Chapter 1). The PCI2 connector is available for use with any one-third-length commercial PCI card. support.dell.com Installing Upgrades on the System Board 2-13
-
 1
1 -
2
-
3
-
4
-
5
-
6
-
7
-
8
-
9
-
10
-
11
-
12
-
13
-
14
-
15
-
16
-
17
-
18
-
19
-
20
-
21
-
22
-
23
-
24
-
25
-
26
-
27
-
 28
28 -
 29
29 -
 30
30 -
 31
31 -
 32
32 -
 33
33 -
 34
34 -
 35
35 -
 36
36 -
 37
37 -
 38
38 -
39
-
40
-
41
-
42
-
43
-
44
-
45
-
46
-
47
-
48
-
49
-
50
-
51
-
52
-
53
-
54
-
55
-
56
-
57
-
58
-
59
-
60
-
61
-
62
-
63
-
64
-
65
-
66
-
67
-
68
-
69
-
70
-
71
-
72
-
73
-
74
-
75
-
76
-
77
-
78
-
79
-
80
-
81
-
82
-
83
-
84
-
85
-
86
-
87
-
88
-
89
-
90
-
91
-
92
-
93
-
94
-
95
-
96
-
97
-
98
-
99
-
100
-
101
-
102
-
103
-
104
-
105
-
106
-
107
-
108
-
109
-
110
-
111
-
112
-
113
-
114
-
115
-
116
-
117
-
118
-
119
-
120
-
121
-
122
 |
 |
