Dell FC4 Brocade 5000 Hardware Reference - Page 18
Providing Power to the Switch, Creating a Serial Connection
 |
View all Dell FC4 Brocade 5000 manuals
Add to My Manuals
Save this manual to your list of manuals |
Page 18 highlights
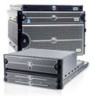
2 Configuring the Brocade 5000 The following items are required for configuring and connecting the Brocade 5000 for use in a network and fabric: • The Brocade 5000, installed and connected to a power source • A workstation computer that has a terminal emulator application (such as HyperTerminal for Windows) • An unused IP address and corresponding subnet mask and gateway address • The serial cable provided with the switch • An Ethernet cable • SFP transceivers and compatible fibre cables, as required • Access to an FTP server, for backing up the switch configuration To configure the Brocade 5000, you must perform the following tasks: 1. "Providing Power to the Switch" on page 8 2. "Creating a Serial Connection" on page 8 3. "Connecting to the Switch Using the Serial Connection" on page 9 4. "Setting the Switch IP Address" on page 9 5. "Creating an Ethernet Connection" on page 10 6. "Completing Switch Configuration" on page 10 ATTENTION Do not connect the switch to the network until the IP address is correctly set. For instructions on how to set the IP address, see "Configuring the Brocade 5000" on page 7. Providing Power to the Switch To provide electrical power to the Brocade 5000: 1. Connect the power cords to both power supplies and then to power sources on separate circuits to protect against AC failure. Ensure that the cords have a minimum service loop of 6 inches available and are routed to avoid stress. 2. Power on the power supplies by flipping both AC switches to "I". The power supply LED lights up green, and the switch begins running POST. The switch requires a minimum of three minutes to boot and complete POST. CAUTION Power is supplied to the switch as soon as the first power supply is connected and turned on. 3. After POST is complete, verify that the switch power and status LEDs on the left of the port side of the switch are green. Creating a Serial Connection To create a serial connection to the Brocade 5000: 8 Brocade 5000 Hardware Reference Manual Publication Number: 53-1000424-03
-
 1
1 -
2
-
3
-
4
-
5
-
6
-
7
-
8
-
9
-
10
-
11
-
12
-
 13
13 -
 14
14 -
 15
15 -
 16
16 -
 17
17 -
 18
18 -
 19
19 -
 20
20 -
 21
21 -
 22
22 -
 23
23 -
24
-
25
-
26
-
27
-
28
-
29
-
30
-
31
-
32
-
33
-
34
-
35
-
36
-
37
-
38
-
39
-
40
-
41
-
42
-
43
-
44
-
45
-
46
-
47
-
48
-
49
-
50
 |
 |