Dell Force10 C300 Installing and Maintaining the C150 System - Page 11
Preparing the Site, Site Selection Criteria, Preparing the Equipment Rack
 |
View all Dell Force10 C300 manuals
Add to My Manuals
Save this manual to your list of manuals |
Page 11 highlights
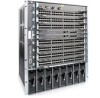
3 Preparing the Site Site Selection Criteria Before beginning the installation process, make sure that the area where you intend to install your C150 meets the following safety requirements: • It is in a restricted access area. • It is in a dry, clean, well-ventilated, temperature-controlled room, that is away from heat sources such as hot air vents or direct sunlight. • It is away from sources of severe electromagnetic noise. • It is near an adequate power source. • The AC power supply cord is used as the main disconnect device; ensure that the socket outlet is located/installed near the equipment and is easily accessible. • Connect the C150 to the appropriate branch circuit protection, as defined by local electrical codes. • It is positioned in a rack with adequate space in the front, rear, and sides of the unit for proper ventilation, access to cables, and maintenance access. • Allow at least six inches (16 cm) of clearance around the side intake and exhaust vents. • Allow at least 12 inches (30.5 cm) between two C150s or a C150 and another side airflow chassis. • Allow at least 18 inches in the front and rear of the rack. NOTE: The C-Series does not have an air filter, so take special care in making sure that the installation site and the chassis itself are cleaned regularly. Preparing the Equipment Rack When you prepare your equipment rack: • Make sure that the rack is bolted to the floor and braced to a wall or ceiling. • Make sure that the rack is permanently grounded to earth ground. The equipment rack must be grounded to the same ground point used by the power service in your area. • The AC power cord is the primary ground. When you install the chassis, use a level to ensure that the chassis is installed level. Preparing the Site | 11
-
 1
1 -
2
-
3
-
4
-
5
-
 6
6 -
 7
7 -
 8
8 -
 9
9 -
 10
10 -
 11
11 -
 12
12 -
 13
13 -
 14
14 -
 15
15 -
 16
16 -
17
-
18
-
19
-
20
-
21
-
22
-
23
-
24
-
25
-
26
-
27
-
28
-
29
-
30
-
31
-
32
-
33
-
34
-
35
-
36
-
37
-
38
-
39
-
40
-
41
-
42
-
43
-
44
-
45
-
46
-
47
-
48
-
49
-
50
-
51
-
52
-
53
-
54
-
55
-
56
-
57
-
58
-
59
-
60
-
61
-
62
-
63
-
64
-
65
-
66
 |
 |
