Dell Latitude CPt V Service Manual - Page 21
The drive is on the left side of the computer.
 |
View all Dell Latitude CPt V manuals
Add to My Manuals
Save this manual to your list of manuals |
Page 21 highlights
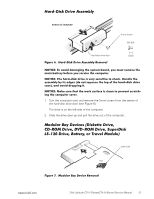
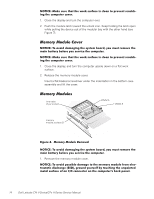
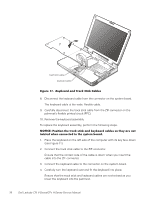
bottom of computer 5-mm screw M3.0x5 hard-disk drive door 1. Turn the computer over, and remove the 5-mm screw from the center of the hard-disk drive door (see Figure 6). The drive is on the left side of the computer. 2. Slide the drive door up and pull the drive out of the computer. latch lock support.dell.com Dell Latitude CPt V-Series/CPx H-Series Service Manual 13
-
 1
1 -
2
-
3
-
4
-
5
-
6
-
7
-
8
-
9
-
10
-
11
-
12
-
13
-
14
-
15
-
 16
16 -
 17
17 -
 18
18 -
 19
19 -
 20
20 -
 21
21 -
 22
22 -
 23
23 -
 24
24 -
 25
25 -
 26
26 -
27
-
28
-
29
-
30
-
31
-
32
-
33
-
34
-
35
-
36
-
37
-
38
-
39
-
40
-
41
-
42
-
43
-
44
-
45
-
46
 |
 |

support.dell.com
Dell Latitude CPt V-Series/CPx H-Series Service Manual
13
±²³´µ¶·¸¹º¶³·»¼º½¸¸¼¾¿ÀÁ
±²³´µ¶·/¹··0Áµ!1)²Ç2·)µ²Ë¶·ÆÇǶ¼ÈÉŷʶ¼»ËÁÉ
±²³´µ¶·¸³Å¸¾Íź¼¸¼¾Ç¾Èº»È¸¿ÂÀ¸ÁËÁ¿ÀǸΞü"¸ËÅ̸ÇÌÁ¿¸ÃÀÇÅÍÀ¸¿ÂÀ¸
Ǿº»¸Î¾¿¿ÀÃ˸ÎÀÊÅÃÀ¸ËÅ̸ÁÀÃͺ½À¸¿ÂÀ¸½ÅÇÄÌ¿ÀÃÏ
±²³´µ¶·¸³ÂÀ¸Â¾Ã¼%¼ºÁ&¸¼ÃºÍÀ¸ºÁ¸ÍÀÃ˸ÁÀ»Áº¿ºÍÀ¸¿Å¸ÁÂŽ&ϸ/¾»¼ÆÀ¸¿ÂÀ¸
¾ÁÁÀÇÎÆ˸Î˸º¿Á¸À¼ÈÀÁ¸(¼Å¸»Å¿¸Á0ÌÀÀ!À¸¿ÂÀ¸¿ÅĸÅʸ¿ÂÀ¸Â¾Ã¼%¼ºÁ&¸¼ÃºÍÀ¸
½¾ÁÀ*"¸¾»¼¸¾Íź¼¸¼ÃÅÄĺ»È¸º¿Ï
±²³´µ¶·¸,¾&À¸ÁÌÃÀ¸¿Â¾¿¸¿ÂÀ¸ÉÅÃ&¸ÁÌÃʾ½À¸ºÁ¸½ÆÀ¾»¸¿Å¸ÄÃÀÍÀ»¿¸Á½Ã¾¿½Â%
º»È¸¿ÂÀ¸½ÅÇÄÌ¿Àø½ÅÍÀÃÏ
1.
Turn the computer over, and remove the 5-mm screw from the center of
the hard-disk drive door (see Figure 6).
The drive is on the left side of the computer.
2.
Slide the drive door up and pull the drive out of the computer.
ÂôÄÀ²³ºÅ²Áº¶¼»·Æ¼¸ºÇ¶·¸¹¼Èȼº¶³·»¼Éº
ʶµËÌ ¶³·»¼Éº¶Í¶µË̺¶³·»¼ÉºÎÄϼ³¶·¸¹º
°Îµ!"#º¶³·»¼ÉºÅ²Èȼ³Áɺóº$³²»¼ÀºÂôÄÀ¼%ººººººº
±²³´µ¶·3¹··Ã»!´ÉÁµ·ÄÁÅ·)¶Ë²Î¶·Ê¶¼»ËÁÉ···
bottom of computer
hard-disk drive door
5-mm screw
M3.0x5
latch lock