Dell Latitude E5500 Service Manual - Page 12
Processor Heat Sink
 |
View all Dell Latitude E5500 manuals
Add to My Manuals
Save this manual to your list of manuals |
Page 12 highlights
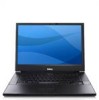
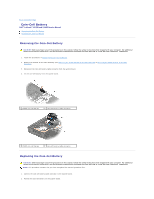
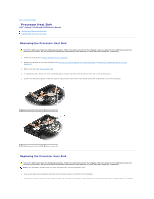
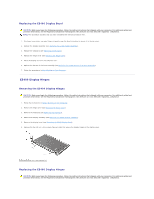
Back to Contents Page Processor Heat Sink Dell™ Latitude™ E5400 and E5500 Service Manual Removing the Processor Heat Sink Replacing the Processor Heat Sink Removing the Processor Heat Sink CAUTION: Before you begin the following procedure, follow the safety instructions that shipped with your computer. For additional safety best practices information, see the Regulatory Compliance Homepage on www.dell.com at: www.dell.com/regulatory_compliance. 1. Follow the instructions in Before Working on Your Computer. 2. Remove the bottom of the base assembly (see Removing the E5400 Bottom of the Base Assembly or Removing the E5500 Bottom of the Base Assembly). 3. Remove the fan (see Removing the Fan). 4. In sequential order, loosen the four numbered captive screws that secure the processor heat sink to the system board. 5. Loosen the remaining captive screw that secures the processor heat sink to the system board and carefully lift it out of the computer. 1 E5400 processor heat sink 2 captive screws (5) 1 E5500 processor heat sink 2 captive screws (5) Replacing the Processor Heat Sink CAUTION: Before you begin the following procedure, follow the safety instructions that shipped with your computer. For additional safety best practices information, see the Regulatory Compliance Homepage on www.dell.com at: www.dell.com/regulatory_compliance. NOTE: This procedure assumes that you have completed the removal procedure first. 1. Line up and secure the processor heat sink with the screw closest to the front of the computer. 1. Align the five captive screws on the processor heat sink with the screw holes on the system board and secure the screws. Tighten the four numbered
-
 1
1 -
2
-
3
-
4
-
5
-
6
-
 7
7 -
 8
8 -
 9
9 -
 10
10 -
 11
11 -
 12
12 -
 13
13 -
 14
14 -
 15
15 -
 16
16 -
 17
17 -
18
-
19
-
20
-
21
-
22
-
23
-
24
-
25
-
26
-
27
-
28
-
29
-
30
-
31
-
32
-
33
-
34
-
35
-
36
-
37
-
38
-
39
-
40
-
41
-
42
-
43
-
44
-
45
-
46
-
47
-
48
-
49
-
50
-
51
-
52
-
53
-
54
-
55
-
56
-
57
-
58
-
59
-
60
-
61
-
62
-
63
-
64
-
65
-
66
-
67
-
68
-
69
-
70
-
71
-
72
-
73
 |
 |