Dell Latitude E5500 Service Manual - Page 6
Flashing the BIOS - service manual
 |
View all Dell Latitude E5500 manuals
Add to My Manuals
Save this manual to your list of manuals |
Page 6 highlights
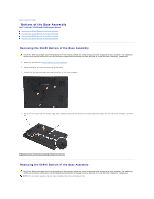
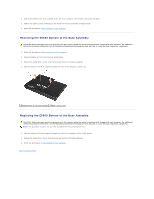
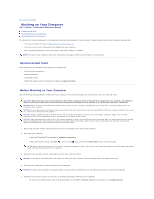
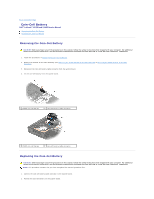
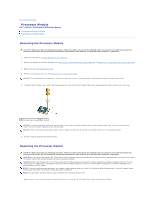
Back to Contents Page Flashing the BIOS Dell™ Latitude™ E5400 and E5500 Service Manual Flashing the BIOS From a CD Flashing the BIOS From the Hard Drive If a BIOS-update program media, such as a CD, is provided with a new system board, flash the BIOS from the media. If you do not have a BIOS-update program media, see Flashing the BIOS From the Hard Drive. Flashing the BIOS From a CD NOTICE: Connect the AC adapter to an electrical outlet that is known to be working properly to prevent a loss of power. Failure to do so may cause system damage. 1. Ensure that the AC adapter is connected to an electrical outlet and that the main battery is installed properly. 2. Start your computer. 3. Press the eject button at the front of the optical drive to open the drive tray. 4. Place the BIOS-update CD in the center of the drive tray, then gently push to close the tray. 5. Restart the computer. 6. When the DELL logo appears, press immediately. NOTE: Keyboard failure may result when a key on the keyboard is held down for extended periods of time. To avoid possible keyboard failure, press and release in even intervals until the Boot Device Menu appears. If you wait too long and the operating system logo appears, continue to wait until you see the Microsoft® Windows® desktop, then shut down your computer and try again. 7. At the Boot Device Menu, use the up- and down-arrow keys or press the appropriate number on the keyboard to highlight CD-ROM, and then press . NOTE: The Quickboot feature changes the boot sequence for the current boot only. Upon restart, the computer boots according to the boot sequence specified in system setup. NOTICE: Do not interrupt this process once it begins. Doing so may cause system damage. 8. Follow the instructions that appear on the screen. The computer continues to boot and updates the new BIOS. When the flash update is complete, the computer automatically reboots. 9. Remove the flash BIOS update program CD from the drive. Flashing the BIOS From the Hard Drive NOTICE: Connect the AC adapter to an electrical outlet that is known to be working properly to prevent a loss of power. Failure to do so may cause system damage. 1. Ensure that the AC adapter is connected to an electrical outlet, that the main battery is properly installed, and that a network cable is attached. 2. Start the computer. 3. Locate the latest BIOS update file for your computer at support.dell.com. 4. Click Download Now to download the file. 5. If the Export Compliance Disclaimer window appears, click Yes, I Accept this Agreement. 6. In the File Download window, click Save this program to disk, and then click OK. 7. In the Save In window, click the down arrow to view the Save In menu, select Desktop, and then click Save.
-
 1
1 -
 2
2 -
 3
3 -
 4
4 -
 5
5 -
 6
6 -
 7
7 -
 8
8 -
 9
9 -
 10
10 -
 11
11 -
 12
12 -
13
-
14
-
15
-
16
-
17
-
18
-
19
-
20
-
21
-
22
-
23
-
24
-
25
-
26
-
27
-
28
-
29
-
30
-
31
-
32
-
33
-
34
-
35
-
36
-
37
-
38
-
39
-
40
-
41
-
42
-
43
-
44
-
45
-
46
-
47
-
48
-
49
-
50
-
51
-
52
-
53
-
54
-
55
-
56
-
57
-
58
-
59
-
60
-
61
-
62
-
63
-
64
-
65
-
66
-
67
-
68
-
69
-
70
-
71
-
72
-
73
 |
 |