Dell OptiPlex GX620 Quick Reference Guide - Page 20
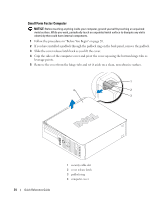
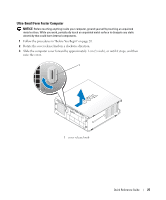
Removing the Computer Cover, Before You Begin - for windows 7
 |
View all Dell OptiPlex GX620 manuals
Add to My Manuals
Save this manual to your list of manuals |
Page 20 highlights
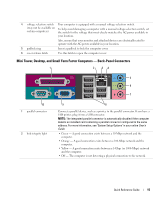
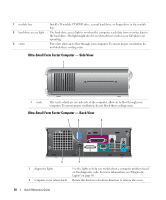
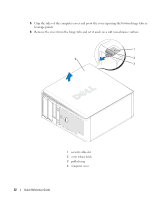
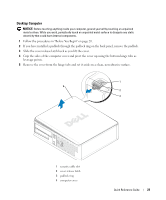
3 network adapter connector 4 network activity light 5 line-out connector 6 line-in connector 7 USB connectors (5) 8 serial connector 9 video connector 10 power connector 11 diagnostic lights Attach the UTP cable to an RJ45 jack wall plate or to an RJ45 port on a UTP concentrator or hub, and press the other end of the UTP cable into the network adapter connector until the cable snaps securely into place. It is recommended that you use Category 5 wiring and connectors for networks. The amber light flashes when the computer is transmitting or receiving network data. A high volume of network traffic may make this light appear to be in a steady "on" state. Use the green line-out connector to attach an amplified speaker set. Use the blue line-in connector to attach a record/playback device such as a cassette player, CD player, or VCR. Connect USB devices such as a mouse, keyboard, printer, joystick, and computer speakers into any of the USB connectors. Connect a serial device, such as a handheld device, to the serial connector. If you have a DVI-compatible monitor, plug the cable from your monitor into the white connector on the back panel. If you have a VGA monitor, see "Connecting a VGA Monitor" in your online User's Guide. Connect the power cable to this connector. See "Diagnostic Lights" on page 36 for a description of light codes that can help you troubleshoot problems with your computer. Removing the Computer Cover CAUTION: Before you begin any of the procedures in this section, follow the safety instructions in the Product Information Guide. CAUTION: To guard against electrical shock, always unplug your computer from the electrical outlet before removing the cover. Before You Begin NOTICE: To avoid losing data, save and close any open files and exit any open programs before you turn off your computer. 1 Shut down the operating system: a Save and close any open files, exit any open programs, click the Start button, and then click Turn Off Computer. b In the Turn off computer window, click Turn off. The computer turns off after the operating system shutdown process finishes. 2 Ensure that the computer and any attached devices are turned off. If your computer and attached devices did not automatically turn off when you shut down your operating system, turn them off now. 20 Quick Reference Guide
-
 1
1 -
2
-
3
-
4
-
5
-
6
-
7
-
8
-
9
-
10
-
11
-
12
-
13
-
14
-
 15
15 -
 16
16 -
 17
17 -
 18
18 -
 19
19 -
 20
20 -
 21
21 -
 22
22 -
 23
23 -
 24
24 -
 25
25 -
26
-
27
-
28
-
29
-
30
-
31
-
32
-
33
-
34
-
35
-
36
-
37
-
38
-
39
-
40
-
41
-
42
-
43
-
44
-
45
-
46
-
47
-
48
-
49
-
50
-
51
-
52
-
53
-
54
-
55
-
56
-
57
-
58
-
59
-
60
-
61
-
62
-
63
-
64
-
65
-
66
-
67
-
68
-
69
-
70
-
71
-
72
-
73
-
74
-
75
-
76
-
77
-
78
-
79
-
80
-
81
-
82
-
83
-
84
-
85
-
86
-
87
-
88
-
89
-
90
-
91
-
92
-
93
-
94
-
95
-
96
-
97
-
98
-
99
-
100
-
101
-
102
-
103
-
104
-
105
-
106
-
107
-
108
-
109
-
110
-
111
-
112
-
113
-
114
-
115
-
116
-
117
-
118
-
119
-
120
-
121
-
122
-
123
-
124
-
125
-
126
-
127
-
128
-
129
-
130
-
131
-
132
-
133
-
134
-
135
-
136
-
137
-
138
-
139
-
140
-
141
-
142
-
143
-
144
 |
 |
