Dell OptiPlex GXa Service Manual - Page 119
System Battery, To remove the SEC cartridge/heat sink assembly, follow these steps
 |
View all Dell OptiPlex GXa manuals
Add to My Manuals
Save this manual to your list of manuals |
Page 119 highlights
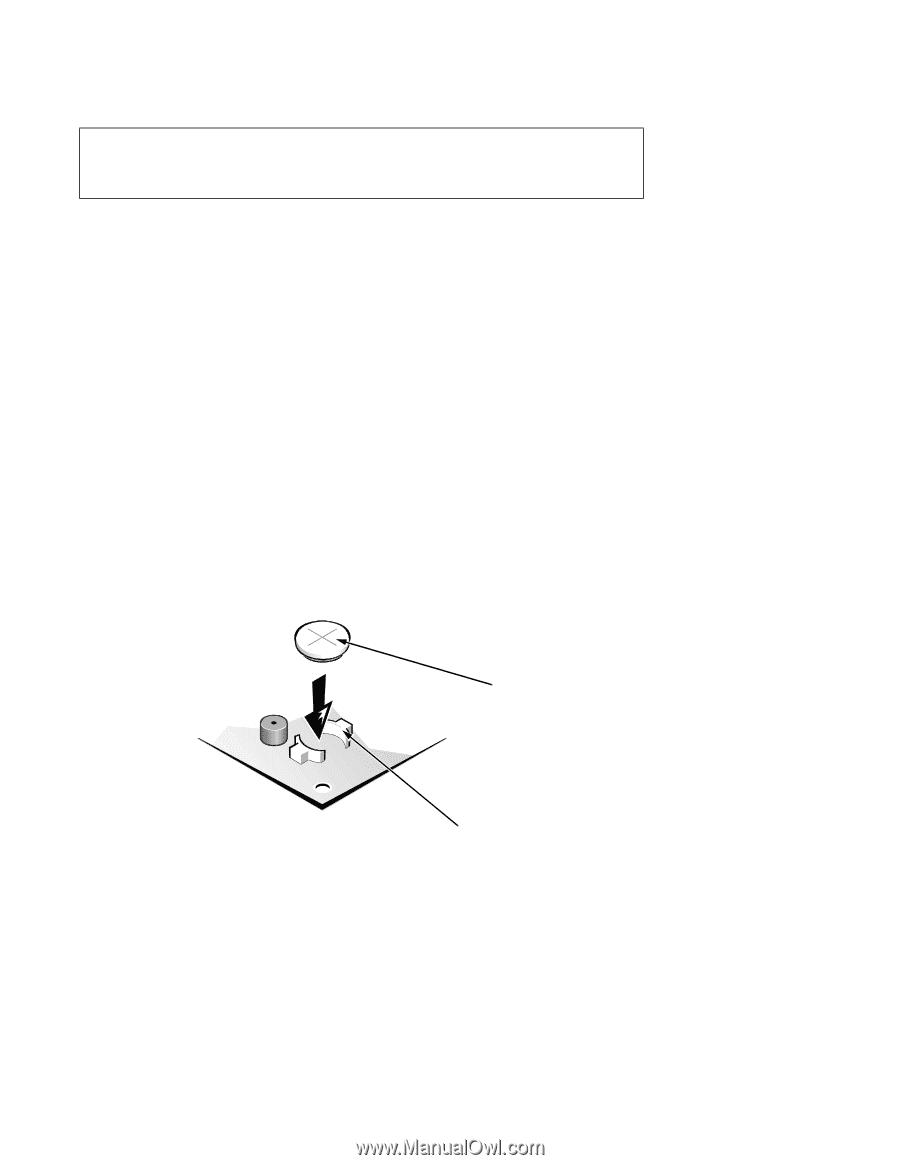
To remove the SEC cartridge/heat sink assembly, follow these steps: 1. Remove the system power supply. WARNING: The SEC cartridge/heat sink assembly can get extremely hot during system operations. Be sure that the assembly has had sufficient time to cool before touching it. 2. Locate the SEC cartridge/heat sink assembly. 3. Disconnect the microprocessor fan connector from the 3-pin connector on the system board (labeled "FAN"), located between the SERIAL 2 connector and the MONITOR connector (see Figure 5-18). 4. Release the two securing clips near the base of the heat sink from the metal standoffs, as shown in Figure 5-22. 5. Locate and press inward on the SEC cartridge release latches (located directly on top of the SEC cartridge adjacent to the heat sink assembly) until the latches click. 6. Lift the SEC cartridge/heat sink assembly out of its guide bracket assembly/connector on the system board. NOTE: When installing the SEC cartridge/heat sink assembly, carefully orient the assembly and press firmly with up to 25 pounds of force to mate the SEC cartridge with its connector. Then slide the SEC cartridge release latches outward to lock the assembly onto the metal standoffs. System Battery battery Figure 5-23. System Battery Installation BATTERY socket Removing and Replacing Parts on the Midsize Chassis 5-23
-
 1
1 -
2
-
3
-
4
-
5
-
6
-
7
-
8
-
9
-
10
-
11
-
12
-
13
-
14
-
15
-
16
-
17
-
18
-
19
-
20
-
21
-
22
-
23
-
24
-
25
-
26
-
27
-
28
-
29
-
30
-
31
-
32
-
33
-
34
-
35
-
36
-
37
-
38
-
39
-
40
-
41
-
42
-
43
-
44
-
45
-
46
-
47
-
48
-
49
-
50
-
51
-
52
-
53
-
54
-
55
-
56
-
57
-
58
-
59
-
60
-
61
-
62
-
63
-
64
-
65
-
66
-
67
-
68
-
69
-
70
-
71
-
72
-
73
-
74
-
75
-
76
-
77
-
78
-
79
-
80
-
81
-
82
-
83
-
84
-
85
-
86
-
87
-
88
-
89
-
90
-
91
-
92
-
93
-
94
-
95
-
96
-
97
-
98
-
99
-
100
-
101
-
102
-
103
-
104
-
105
-
106
-
107
-
108
-
109
-
110
-
111
-
112
-
113
-
 114
114 -
 115
115 -
 116
116 -
 117
117 -
 118
118 -
 119
119 -
 120
120 -
 121
121 -
 122
122 -
 123
123 -
 124
124 -
125
-
126
-
127
-
128
-
129
-
130
-
131
-
132
-
133
-
134
-
135
-
136
-
137
-
138
-
139
-
140
-
141
-
142
-
143
-
144
-
145
-
146
-
147
-
148
-
149
-
150
-
151
-
152
-
153
-
154
-
155
-
156
-
157
-
158
-
159
-
160
-
161
-
162
-
163
-
164
-
165
-
166
-
167
-
168
-
169
-
170
-
171
-
172
-
173
-
174
-
175
-
176
-
177
-
178
-
179
-
180
-
181
 |
 |