Dell PowerConnect 3524 Getting Started Guide - Page 17
Starting and Configuring the Device
 |
View all Dell PowerConnect 3524 manuals
Add to My Manuals
Save this manual to your list of manuals |
Page 17 highlights
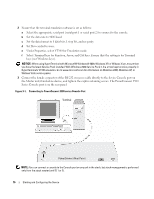
Starting and Configuring the Device After completing all external connections, connect a terminal to the device to configure the device. Performing the additional advanced functions are described in the Dell PowerConnect 3500 Series User's Guide on the Documentation CD. NOTE: Before proceeding further, read the release notes for this product. You can download the release notes from the Dell Support website at support.dell.com. NOTE: We recommend that you obtain the most recent revision of the user documentation from the Dell Support website at support.dell.com. Connecting to the Device To configure the device, the device must be connected to a console, but if the device is part of a stack, only one device called the Master unit in the whole stack needs to be connected to a terminal. You can identify the Master unit by the illuminated Master LED on the front panel of the switch. Because the stack operates as a single device, only the Master unit is configured. Connecting the Terminal to the Device The device provides a Console port that enables a connection to a terminal desktop system running terminal emulation software for monitoring and configuring the device. The Console port connector is a male DB-9 connector, implemented as a data terminal equipment (DTE) connector. To use the Console port, the following is required: • VT100-compatible terminal or a desktop or portable system with a serial port and running VT100 terminal emulation software • An RS-232 crossover cable with a female DB-9 connector for the Console port and the appropriate connector for the terminal To connect a terminal to the device Console port, perform the following tasks: 1 Connect the supplied RS-232 crossover cable to the terminal running VT100 terminal emulation software. Starting and Configuring the Device 15
-
 1
1 -
2
-
3
-
4
-
5
-
6
-
7
-
8
-
9
-
10
-
11
-
 12
12 -
 13
13 -
 14
14 -
 15
15 -
 16
16 -
 17
17 -
 18
18 -
 19
19 -
 20
20 -
 21
21 -
 22
22 -
23
-
24
-
25
-
26
-
27
-
28
-
29
-
30
-
31
-
32
-
33
-
34
-
35
-
36
-
37
-
38
-
39
-
40
-
41
-
42
-
43
-
44
-
45
-
46
-
47
-
48
-
49
-
50
-
51
-
52
-
53
-
54
-
55
-
56
-
57
-
58
-
59
-
60
-
61
-
62
-
63
-
64
-
65
-
66
-
67
-
68
-
69
-
70
-
71
-
72
-
73
-
74
-
75
-
76
-
77
-
78
-
79
-
80
-
81
-
82
-
83
-
84
-
85
-
86
-
87
-
88
-
89
-
90
-
91
-
92
-
93
-
94
-
95
-
96
-
97
-
98
-
99
-
100
-
101
-
102
-
103
-
104
-
105
-
106
-
107
-
108
-
109
-
110
-
111
-
112
-
113
-
114
-
115
-
116
-
117
-
118
-
119
-
120
-
121
-
122
-
123
-
124
-
125
-
126
-
127
-
128
-
129
-
130
-
131
-
132
-
133
-
134
-
135
-
136
-
137
-
138
-
139
-
140
-
141
-
142
-
143
-
144
-
145
-
146
-
147
-
148
-
149
-
150
-
151
-
152
-
153
-
154
-
155
-
156
-
157
-
158
-
159
-
160
-
161
-
162
-
163
-
164
-
165
-
166
-
167
-
168
-
169
-
170
-
171
-
172
-
173
-
174
-
175
-
176
-
177
-
178
-
179
-
180
-
181
-
182
-
183
-
184
-
185
-
186
-
187
-
188
-
189
-
190
-
191
-
192
-
193
-
194
-
195
-
196
-
197
-
198
-
199
-
200
-
201
-
202
-
203
-
204
-
205
-
206
-
207
-
208
-
209
-
210
-
211
-
212
-
213
-
214
-
215
-
216
-
217
-
218
-
219
-
220
-
221
-
222
-
223
-
224
-
225
-
226
-
227
-
228
-
229
-
230
-
231
-
232
-
233
-
234
-
235
-
236
-
237
-
238
-
239
-
240
-
241
-
242
-
243
-
244
-
245
-
246
-
247
-
248
-
249
-
250
-
251
-
252
-
253
-
254
-
255
-
256
-
257
-
258
-
259
-
260
-
261
-
262
-
263
-
264
-
265
-
266
 |
 |