Dell PowerConnect FCS624S Getting Started Guide - Page 15
Connecting devices in a stack, B-FCX624S and B-FCX648S devices
 |
View all Dell PowerConnect FCS624S manuals
Add to My Manuals
Save this manual to your list of manuals |
Page 15 highlights
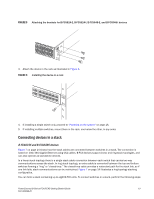
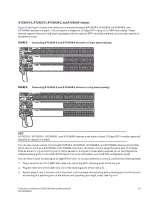
FIGURE 5 Attaching the brackets for B-FCX624-E, B-FCX624-I, B-FCX648-E, and B-FCX648-I devices 3. Attach the device in the rack as illustrated in Figure 6. FIGURE 6 Installing the device in a rack 4. If installing a single switch only, proceed to "Powering on the system" on page 16. 5. If installing multiple switches, mount them in the rack, one below the other, in any order. Connecting devices in a stack B-FCX624S and B-FCX648S devices Figure 7 on page 14 shows how the stack cables are connected between switches in a stack. The connection is based on 10G/16G Gigabit Ethernet using CX4 cables. B-FCX devices support linear and ring stack topologies, and can also operate as standalone devices. In a linear stack topology there is a single stack cable connection between each switch that carries two-way communications across the stack. In ring stack topology, an extra cable is connected between the top and bottom switches forming a "ring" or "closed-loop." The closed-loop cable provides a redundant path for the stack link, so if one link fails, stack communications can be maintained. Figure 7 on page 14 illustrates a ring-topology stacking configuration. You can form a stack containing up to eight B-FCX units. To connect switches in a stack, perform the following steps: PowerConnect B-Series FCX/FCXS Getting Started Guide 13 53-1002049-01
-
 1
1 -
2
-
3
-
4
-
5
-
6
-
7
-
8
-
9
-
 10
10 -
 11
11 -
 12
12 -
 13
13 -
 14
14 -
 15
15 -
 16
16 -
 17
17 -
 18
18 -
 19
19 -
 20
20 -
21
-
22
-
23
-
24
-
25
-
26
-
27
-
28
-
29
-
30
-
31
-
32
-
33
-
34
-
35
-
36
-
37
-
38
-
39
-
40
-
41
-
42
-
43
-
44
-
45
-
46
-
47
-
48
-
49
-
50
-
51
-
52
-
53
-
54
-
55
-
56
-
57
-
58
-
59
-
60
-
61
-
62
-
63
-
64
-
65
-
66
-
67
-
68
-
69
-
70
-
71
-
72
-
73
-
74
-
75
-
76
-
77
-
78
-
79
-
80
-
81
-
82
-
83
-
84
-
85
-
86
-
87
-
88
-
89
-
90
-
91
-
92
-
93
-
94
-
95
-
96
-
97
-
98
-
99
-
100
-
101
-
102
-
103
-
104
-
105
-
106
-
107
-
108
-
109
-
110
-
111
-
112
-
113
-
114
-
115
-
116
-
117
-
118
-
119
-
120
-
121
-
122
-
123
-
124
-
125
-
126
-
127
-
128
-
129
-
130
-
131
-
132
-
133
-
134
-
135
-
136
-
137
-
138
-
139
-
140
-
141
-
142
-
143
-
144
-
145
-
146
-
147
-
148
-
149
-
150
-
151
-
152
-
153
-
154
-
155
-
156
-
157
-
158
-
159
-
160
-
161
-
162
-
163
-
164
-
165
-
166
-
167
-
168
-
169
-
170
-
171
-
172
-
173
-
174
-
175
-
176
-
177
-
178
-
179
-
180
-
181
-
182
-
183
-
184
-
185
-
186
-
187
-
188
-
189
-
190
-
191
-
192
-
193
-
194
-
195
-
196
-
197
-
198
-
199
-
200
-
201
-
202
-
203
-
204
-
205
-
206
-
207
-
208
-
209
-
210
-
211
-
212
-
213
-
214
-
215
-
216
-
217
-
218
-
219
-
220
-
221
-
222
-
223
-
224
-
225
-
226
-
227
-
228
-
229
-
230
-
231
-
232
-
233
-
234
-
235
-
236
-
237
-
238
-
239
-
240
-
241
-
242
-
243
-
244
-
245
-
246
-
247
-
248
-
249
-
250
-
251
-
252
-
253
-
254
-
255
-
256
-
257
-
258
-
259
-
260
 |
 |
