Dell PowerEdge 4600 Rack-to-Tower Conversion Guide - Page 19
Replacing the Rack Doors
 |
View all Dell PowerEdge 4600 manuals
Add to My Manuals
Save this manual to your list of manuals |
Page 19 highlights
www.dell.com | support.dell.com 3 Repeat step 2 at the back of the cabinet for this slide assembly. 4 If the slide assemblies are secured with screws, remove the screws that secure the front and back mounting-bracket flanges to the vertical rails. 5 Repeat steps 1 through 3 (or step 4 if screws secure the slide assemblies) for the remaining slide assembly on the other side of the rack. 6 Place the cable-management arm, slide assemblies, and all fastener hardware in a box. Label the box as a rack installation kit for the system you removed from the rack. Replacing the Rack Doors Refer to the procedures for replacing the rack doors in the documentation provided with your rack cabinets. 1-16 Rack-to-Tower Conversion Guide
-
 1
1 -
2
-
3
-
4
-
5
-
6
-
7
-
8
-
9
-
10
-
11
-
12
-
13
-
 14
14 -
 15
15 -
 16
16 -
 17
17 -
 18
18 -
 19
19
 |
 |

1-16
Rack-to-Tower Conversion Guide
www.dell.com | support.dell.com
3
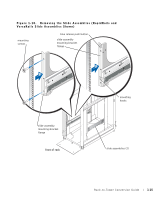
Repeat step 2 at the back of the cabinet for this slide assembly.
4
If the slide assemblies are secured with screws, remove the screws that secure the front
and back mounting-bracket flanges to the vertical rails.
5
Repeat steps 1 through 3 (or step 4 if screws secure the slide assemblies) for the
remaining slide assembly on the other side of the rack.
6
Place the cable-management arm, slide assemblies, and all fastener hardware in a box.
Label the box as a rack installation kit for the system you removed from the rack.
Replacing the Rack Doors
Refer to the procedures for replacing the rack doors in the documentation provided with
your rack cabinets.