Dell PowerEdge 4600 Rack-to-Tower Conversion Guide - Page 9
Removing the System From the Rack - power supply
 |
View all Dell PowerEdge 4600 manuals
Add to My Manuals
Save this manual to your list of manuals |
Page 9 highlights
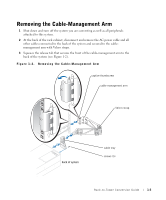
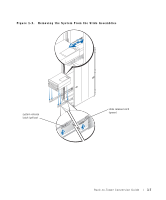
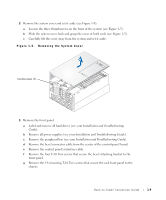
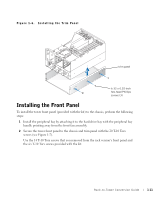
www.dell.com | support.dell.com 4 Pull the cable-management arm away from the cable tray. 5 Remove the captive thumbscrew and bracket that secure the back end of the cablemanagement arm to the back vertical rail (see Figure 1-2). 6 Remove the five 6-32 x 0.25-inch hex-head Phillips that secure the cable tray to the back of the system (see Figure 1-2). 7 Remove the cable tray from the back of the system. Removing the System From the Rack CAUTION: If you are removing more than one system from the rack cabinet, remove the highest of the systems to be removed first. Complete the removal of the first system from the rack before starting the second. Never extend more than one system from the rack at a time. Removing a system from a position high up in the rack cabinet may require up to four people and may require a sturdy, elevated platform to stand on. A mechanical lifting platform or similar equipment of the proper capacity may also be useful. If you attempt to remove and lower the system without enough people to safely perform the task, you risk personal injury to yourself and to others and damage to the system. NOTICE: You will be moving the system chassis several times while you perform this procedure. You may wish to make the system chassis lighter by labeling and removing the hard drives and power supplies (for instructions, see the Installation and Troubleshooting Guide). 1 Loosen the thumbscrews that secure the system to the front vertical rails (at the front of the rack cabinet). 2 Pull the system out of the rack until the green slide release latches lock at the fully extended position. 3 Press up on the yellow system release latches and pull the system forward to the farthest position on the slide assemblies (see Figure 1-3). 4 Using two to four people, grasp the system at each corner and lift the system up and out of the slide asssemblies (see Figure 1-3). If you have difficulty, ensure that the shoulder screws in the slide assemblies are aligned with the openings on the top of the slide assemblies. 5 Place the system on a smooth work surface. 1-6 Rack-to-Tower Conversion Guide
-
 1
1 -
2
-
3
-
 4
4 -
 5
5 -
 6
6 -
 7
7 -
 8
8 -
 9
9 -
 10
10 -
 11
11 -
 12
12 -
 13
13 -
 14
14 -
15
-
16
-
17
-
18
-
19
 |
 |