Dell PowerEdge 6600 Rack Installation Guide (.pdf) - Page 17
Installing the Cover, Pedestal, and Bezel
 |
View all Dell PowerEdge 6600 manuals
Add to My Manuals
Save this manual to your list of manuals |
Page 17 highlights
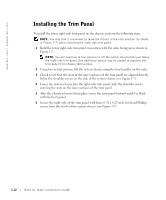
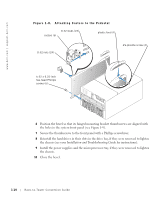
Figure 1-7. Installing the Right-Side Trim Panel 6-32 x 0.25-inch hex-head Phillips screws (3) tower front panel right-side trim panel Installing the Cover, Pedestal, and Bezel 1 Position the system as shown in Figure 1-8. 2 Replace the system front and back covers. 3 Install six casters on the bottom of the pedestal and secure them using 8-32 nuts with attached external star washers. 4 Install four plastic feet and secure each with a #6 plastite screw (see Figure 1-8). 5 Secure the pedestal to the bottom of the system with six 6-32 x 0.25-inch hex-head Phillips screws (see Figure 1-8). Rack-to-Tower Conversion Guide 1-13
-
 1
1 -
2
-
3
-
4
-
5
-
6
-
7
-
8
-
9
-
10
-
11
-
 12
12 -
 13
13 -
 14
14 -
 15
15 -
 16
16 -
 17
17 -
 18
18 -
 19
19 -
 20
20 -
 21
21 -
 22
22
 |
 |
Rack-to-Tower Conversion Guide
1-13
Figure 1-7.
Installing the Right-Side Trim Panel
Installing the Cover, Pedestal, and Bezel
1
Position the system as shown in Figure 1-8.
2
Replace the system front and back covers.
3
Install six casters on the bottom of the pedestal and secure them using 8-32 nuts with
attached external star washers.
4
Install four plastic feet and secure each with a #6 plastite screw (see Figure 1-8).
5
Secure the pedestal to the bottom of the system with six 6-32 x 0.25-inch hex-head
Phillips screws (see Figure 1-8).
tower front panel
right-side trim panel
6-32 x 0.25-inch
hex-head Phillips
screws (3)