Dell PowerEdge 6600 Rack Installation Guide (.pdf) - Page 6
Rack-to-Tower Kit Contents - weight
 |
View all Dell PowerEdge 6600 manuals
Add to My Manuals
Save this manual to your list of manuals |
Page 6 highlights
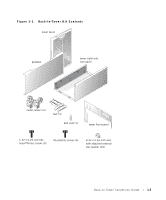
www.dell.com | support.dell.com • Do not move large racks by yourself. Due to the height and weight of the rack, it is recommended that a minimum of two people to perform this task. • Before working on the rack, make sure that the stabilizers are secured to the rack, extend to the floor, and that the full weight of the rack rests on the floor. Install front and side stabilizers on a single rack or front stabilizers for joined multiple racks before working on the rack. • Always load the rack from the bottom up, and load the heaviest item in the rack first. • Make sure that the rack is level and stable before extending a component from the rack. • Use caution when pressing the component rail release latches and sliding a component into or out of a rack; the slide rails can pinch your fingers. • After a component is inserted into the rack, carefully extend the rail into a locking position, and then slide the component into the rack. • Do not overload the power supply branch circuit that provides power to the rack. The total rack load should not exceed 80 percent of the branch circuit rating. • Ensure that proper airflow is provided to components in the rack. • Do not step on or stand on any system/component when servicing other systems/components in a rack. Rack-to-Tower Kit Contents The rack-to-tower kit includes the following items (see Figure 1-1): • One tower bezel with keylock and keys • One tower front panel • One tower right-side trim panel • One pedestal • Six casters • Four plastic feet • Four #6 plastite screws • One ball stud • Nine 6-32 x 0.25-inch hex-head Phillips screws • Twenty-four 8-32 nuts with attached external star washers 1-2 Rack-to-Tower Conversion Guide
-
 1
1 -
 2
2 -
 3
3 -
 4
4 -
 5
5 -
 6
6 -
 7
7 -
 8
8 -
 9
9 -
 10
10 -
 11
11 -
 12
12 -
13
-
14
-
15
-
16
-
17
-
18
-
19
-
20
-
21
-
22
 |
 |