Dell PowerEdge C6320 Dell Owners Manual - Page 34
Network Settings screen, Integrated Devices screen, PXE Device n Settings
 |
View all Dell PowerEdge C6320 manuals
Add to My Manuals
Save this manual to your list of manuals |
Page 34 highlights
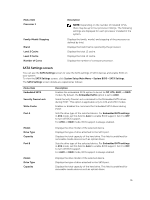
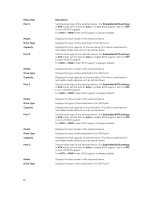
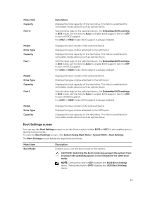
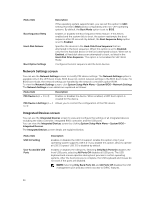
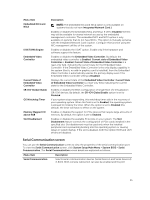
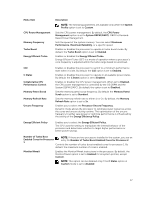
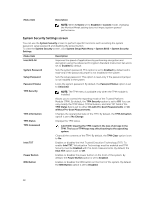
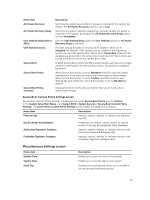
Menu Item Boot Sequence Retry Hard-Disk Failover Boot Option Settings Description If the operating system supports UEFI, you can set this option to UEFI. Setting this field to BIOS allows compatibility with non-UEFI operating systems. By default, the Boot Mode option is set to BIOS. Enables or disables the Boot Sequence Retry feature. If this field is enabled and the system fails to boot, the system reattempts the boot sequence after 30 seconds. By default, the Boot Sequence Retry option is set to Enabled. Specifies the devices in the Hard-Disk Drive Sequence that are attempted in the boot sequence. When this option is set to Disabled, only the first hard disk device in the list is attempted to boot. When set to Enabled, all hard disk devices are attempted to boot, as listed in the Hard-Disk Drive Sequence. This option is not enabled for UEFI Boot Mode. Configures the boot sequence and the boot devices. Network Settings screen You can use the Network Settings screen to modify PXE device settings. The Network Settings option is available only in the UEFI boot mode. BIOS does not control network settings in the BIOS boot mode. For BIOS boot mode, the network settings are handled by the network controllers option ROM. To view the Network Settings screen, click System Setup Main Menu > System BIOS > Network Settings. The Network Settings screen details are explained as follows: Menu Item Description PXE Device n (n = 1 to 4) Enables or disables the device. When enabled, a UEFI boot option is created for the device. PXE Device n Settings (n = 1 Allows you to control the configuration of the PXE device. to 4) Integrated Devices screen You can use the Integrated Devices screen to view and configure the settings of all integrated devices including the video controller, integrated RAID controller, and the USB ports. You can view the Integrated Devices screen by clicking System Setup Main Menu > System BIOS > Integrated Devices. The Integrated Devices screen details are explained below. Menu Item USB 3.0 Setting User Accessible USB Ports Description Enables or disables the USB 3.0 support. Enable this option only if your operating system supports USB 3.0. If you disable this option, devices operate at USB 2.0 speed. USB 3.0 is disabled by default. Enables or disables the USB ports. Selecting Only Back Ports On disables the front USB ports, selecting All Ports Off disables all USB ports. The USB keyboard and mouse operates during boot process in certain operating systems. After the boot process is complete, the USB keyboard and mouse do not work if the ports are disabled. NOTE: Selecting Only Back Ports On and All Ports Off disables the USB management port and also restrict access to iDRAC features. 34
-
 1
1 -
2
-
3
-
4
-
5
-
6
-
7
-
8
-
9
-
10
-
11
-
12
-
13
-
14
-
15
-
16
-
17
-
18
-
19
-
20
-
21
-
22
-
23
-
24
-
25
-
26
-
27
-
28
-
 29
29 -
 30
30 -
 31
31 -
 32
32 -
 33
33 -
 34
34 -
 35
35 -
 36
36 -
 37
37 -
 38
38 -
 39
39 -
40
-
41
-
42
-
43
-
44
-
45
-
46
-
47
-
48
-
49
-
50
-
51
-
52
-
53
-
54
-
55
-
56
-
57
-
58
-
59
-
60
-
61
-
62
-
63
-
64
-
65
-
66
-
67
-
68
-
69
-
70
-
71
-
72
-
73
-
74
-
75
-
76
-
77
-
78
-
79
-
80
-
81
-
82
-
83
-
84
-
85
-
86
-
87
-
88
-
89
-
90
-
91
-
92
-
93
-
94
-
95
-
96
-
97
-
98
-
99
-
100
-
101
-
102
-
103
-
104
-
105
-
106
-
107
-
108
-
109
-
110
-
111
-
112
-
113
-
114
-
115
-
116
-
117
-
118
-
119
-
120
-
121
-
122
-
123
-
124
-
125
-
126
-
127
-
128
-
129
-
130
-
131
-
132
-
133
-
134
-
135
-
136
-
137
-
138
-
139
-
140
-
141
-
142
-
143
-
144
-
145
-
146
-
147
-
148
 |
 |
