Dell PowerEdge M520 Dell M8428-k Getting Started Guide - Page 8
Using the CMC CLI to set the IP address, I/O Module Overview, Setup, IP Address, Subnet Mask, Gateway
 |
View all Dell PowerEdge M520 manuals
Add to My Manuals
Save this manual to your list of manuals |
Page 8 highlights
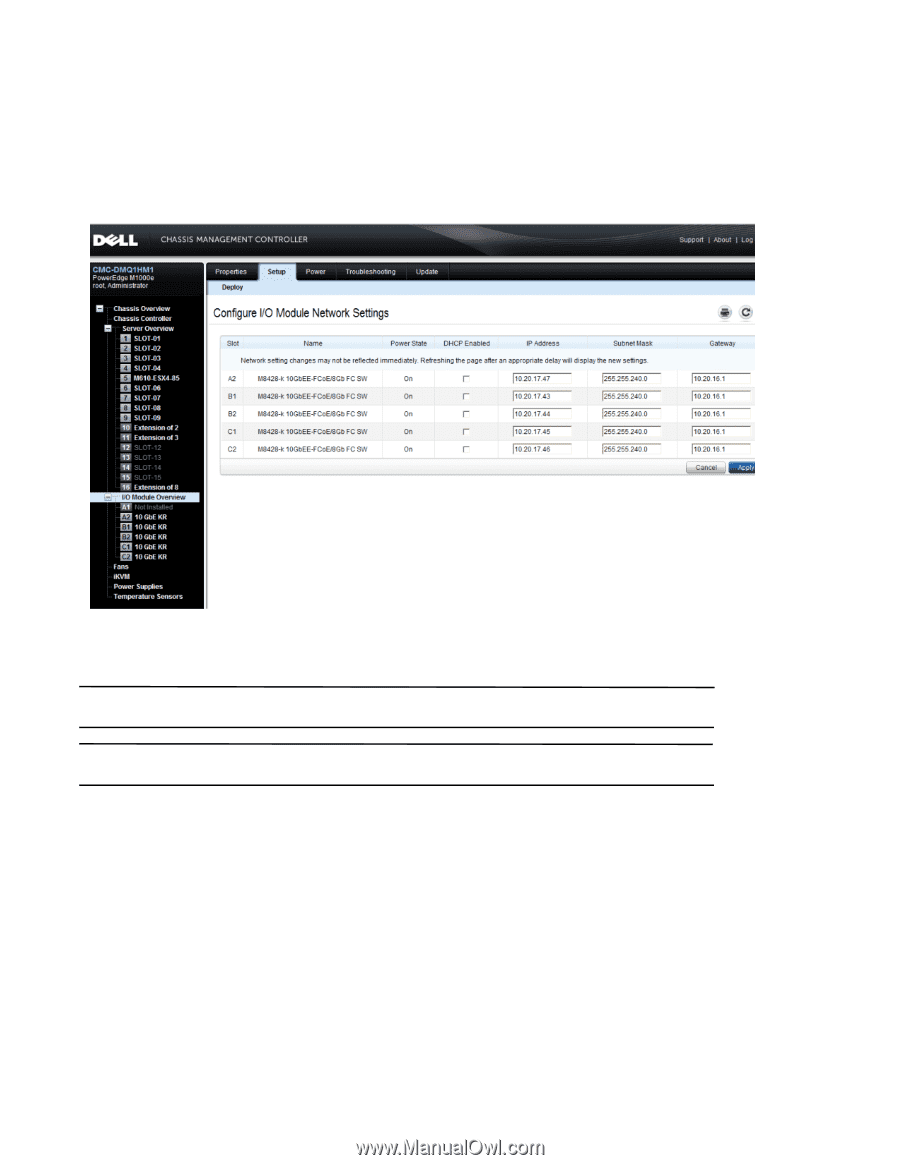
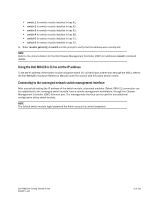
1. Click the I/O Module Overview in the navigation panel of the CMC menu. 2. Open the CMC application's Setup tab. FIGURE 4 CMC Setup Tab 3. Enter the new information in the IP Address for the correct I/O slot, Subnet Mask, and Gateway fields, or enable DHCP, as appropriate and click Apply. ATTENTION In order to see the applied settings click the "Refresh" icon. NOTE TRefer to the documentation for the Dell Chassis Management Controller (CMC) for additional GUI detail. Using the CMC CLI to set the IP address Use the following steps to connect and modify the converged network switch IP address through the CMC CLI. 1. Establish a Telnet session to the CMC CLI. • At the CMC login prompt, enter the CMC username and password. 2. At the command prompt, type the setniccfg command with the correct IP information as shown in the following example: • $ racadm setniccfg -m switch-x -s 10.32.53.47 255.255.240.0 10.32.48.1 Static IP address modified succesfully 3. Substitute the correct value for switch-x where x is the bay where the switch module is installed. For example, switch-x can be: 8 of 192 Dell M8428-k Getting Started Guide MHWKY A01
-
 1
1 -
2
-
 3
3 -
 4
4 -
 5
5 -
 6
6 -
 7
7 -
 8
8 -
 9
9 -
 10
10 -
 11
11 -
 12
12 -
 13
13 -
14
-
15
-
16
-
17
-
18
-
19
-
20
-
21
-
22
-
23
-
24
-
25
-
26
-
27
-
28
-
29
-
30
-
31
-
32
-
33
-
34
-
35
-
36
-
37
-
38
-
39
-
40
-
41
-
42
-
43
-
44
-
45
-
46
-
47
-
48
-
49
-
50
-
51
-
52
-
53
-
54
-
55
-
56
-
57
-
58
-
59
-
60
-
61
-
62
-
63
-
64
-
65
-
66
-
67
-
68
-
69
-
70
-
71
-
72
-
73
-
74
-
75
-
76
-
77
-
78
-
79
-
80
-
81
-
82
-
83
-
84
-
85
-
86
-
87
-
88
-
89
-
90
-
91
-
92
-
93
-
94
-
95
-
96
-
97
-
98
-
99
-
100
-
101
-
102
-
103
-
104
-
105
-
106
-
107
-
108
-
109
-
110
-
111
-
112
-
113
-
114
-
115
-
116
-
117
-
118
-
119
-
120
-
121
-
122
-
123
-
124
-
125
-
126
-
127
-
128
-
129
-
130
-
131
-
132
-
133
-
134
-
135
-
136
-
137
-
138
-
139
-
140
-
141
-
142
-
143
-
144
-
145
-
146
-
147
-
148
-
149
-
150
-
151
-
152
-
153
-
154
-
155
-
156
-
157
-
158
-
159
-
160
-
161
-
162
-
163
-
164
-
165
-
166
-
167
-
168
-
169
-
170
-
171
-
172
-
173
-
174
-
175
-
176
-
177
-
178
-
179
-
180
-
181
-
182
-
183
-
184
-
185
-
186
-
187
-
188
-
189
-
190
-
191
-
192
-
193
-
194
-
195
-
196
-
197
-
198
-
199
-
200
-
201
-
202
 |
 |