Dell PowerEdge PDU Metered LCD Dell PowerEdge 2420 Rack Installation Guide - Page 11
Replacing the Front Door, Opening and Removing the Back Doors
 |
View all Dell PowerEdge PDU Metered LCD manuals
Add to My Manuals
Save this manual to your list of manuals |
Page 11 highlights
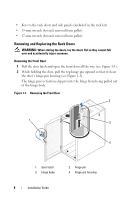
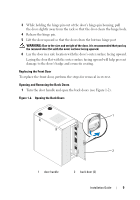
3 While holding the hinge pin out of the door's hinge-pin housing, pull the door slightly away from the rack so that the door clears the hinge body. 4 Release the hinge pin. 5 Lift the door upward so that the door clears the bottom hinge post WARNING: Due to the size and weight of the door, it is recommended that you lay the removed door flat with the outer surface facing upward. 6 Lay the door in a safe location with the door's outer surface facing upward. Laying the door flat with the outer surface facing upward will help prevent damage to the door's badge and cosmetic coating. Replacing the Front Door To replace the front door, perform the steps for removal in reverse. Opening and Removing the Back Doors 1 Turn the door handle and open the back doors (see Figure 1-2). Figure 1-2. Opening the Back Doors 1 2 1 door handle 2 back door (2) Installation Guide 9
-
 1
1 -
2
-
3
-
4
-
5
-
 6
6 -
 7
7 -
 8
8 -
 9
9 -
 10
10 -
 11
11 -
 12
12 -
 13
13 -
 14
14 -
 15
15 -
 16
16 -
17
-
18
-
19
-
20
-
21
-
22
-
23
-
24
-
25
-
26
-
27
-
28
-
29
-
30
-
31
-
32
-
33
-
34
-
35
-
36
-
37
-
38
-
39
-
40
-
41
-
42
-
43
-
44
-
45
-
46
-
47
-
48
-
49
-
50
-
51
-
52
-
53
-
54
-
55
-
56
-
57
-
58
-
59
-
60
-
61
-
62
-
63
-
64
-
65
-
66
-
67
-
68
-
69
-
70
-
71
-
72
-
73
-
74
-
75
-
76
-
77
-
78
-
79
-
80
-
81
-
82
-
83
-
84
-
85
-
86
-
87
-
88
-
89
-
90
-
91
-
92
-
93
-
94
-
95
-
96
-
97
-
98
-
99
-
100
-
101
-
102
-
103
-
104
-
105
-
106
-
107
-
108
-
109
-
110
-
111
-
112
-
113
-
114
-
115
-
116
-
117
-
118
-
119
-
120
-
121
-
122
-
123
-
124
-
125
-
126
-
127
-
128
-
129
-
130
-
131
-
132
-
133
-
134
-
135
-
136
-
137
-
138
-
139
-
140
-
141
-
142
-
143
-
144
-
145
-
146
-
147
-
148
 |
 |
