Dell PowerEdge PDU Metered LCD Dell PowerEdge 2420 Rack Installation Guide - Page 9
Installation Tasks, Recommended Tools and Supplies
 |
View all Dell PowerEdge PDU Metered LCD manuals
Add to My Manuals
Save this manual to your list of manuals |
Page 9 highlights
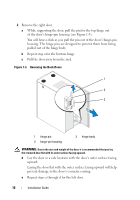
WARNING: For stability, you must ensure that a minimum of 50 lbs. is installed in the bottom 3-U spaces of the rack cabinet. Rack Stabilizer Feet WARNING: Installing systems in a rack without the front and side stabilizer feet installed could cause the rack to tip over, potentially resulting in bodily injury under certain circumstances. Therefore, always install the stabilizer feet before installing components in the rack. WARNING: After installing systems in a rack, never pull more than one system out of the rack on its slide assemblies at one time. The weight of more than one extended system could cause the rack to tip over and cause injury. The stabilizer feet help prevent the rack from tipping over when a system or other component is pulled out of the rack with the slide assemblies fully extended. Installation Tasks Installing a rack cabinet involves performing the following tasks: 1 Removing and replacing the rack doors 2 Removing and replacing the side panels 3 Reversing the front door and badge (optional) 4 Securing the leveling feet 5 Installing the stabilizer feet 6 Adjusting the rack posts (optional) 7 Routing cables through the rack Recommended Tools and Supplies You may need the following tools and supplies to install the rack: • #2 Phillips screwdriver • Flat head screwdriver • 12-mm wrench • Needle-nose pliers • 4-mm Allen wrench (if you want to reverse the direction the front door opens) Installation Guide 7
-
 1
1 -
2
-
3
-
 4
4 -
 5
5 -
 6
6 -
 7
7 -
 8
8 -
 9
9 -
 10
10 -
 11
11 -
 12
12 -
 13
13 -
 14
14 -
15
-
16
-
17
-
18
-
19
-
20
-
21
-
22
-
23
-
24
-
25
-
26
-
27
-
28
-
29
-
30
-
31
-
32
-
33
-
34
-
35
-
36
-
37
-
38
-
39
-
40
-
41
-
42
-
43
-
44
-
45
-
46
-
47
-
48
-
49
-
50
-
51
-
52
-
53
-
54
-
55
-
56
-
57
-
58
-
59
-
60
-
61
-
62
-
63
-
64
-
65
-
66
-
67
-
68
-
69
-
70
-
71
-
72
-
73
-
74
-
75
-
76
-
77
-
78
-
79
-
80
-
81
-
82
-
83
-
84
-
85
-
86
-
87
-
88
-
89
-
90
-
91
-
92
-
93
-
94
-
95
-
96
-
97
-
98
-
99
-
100
-
101
-
102
-
103
-
104
-
105
-
106
-
107
-
108
-
109
-
110
-
111
-
112
-
113
-
114
-
115
-
116
-
117
-
118
-
119
-
120
-
121
-
122
-
123
-
124
-
125
-
126
-
127
-
128
-
129
-
130
-
131
-
132
-
133
-
134
-
135
-
136
-
137
-
138
-
139
-
140
-
141
-
142
-
143
-
144
-
145
-
146
-
147
-
148
 |
 |
