Dell PowerEdge R940 Deploying the 385TB Data Warehouse Fast Track Reference Ar - Page 19
Assign Drive Letter or Path, Specify Volume Size
 |
View all Dell PowerEdge R940 manuals
Add to My Manuals
Save this manual to your list of manuals |
Page 19 highlights
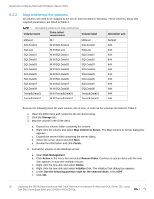
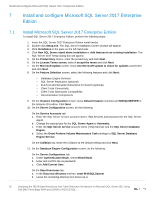
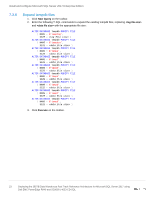
Install and configure Microsoft Windows Server 2016 g. Right-click the unallocated space of the new disk and select New Simple Volume. h. The New Simple Volume Wizard starts. i. Click Next. j. On the Specify Volume Size screen, keep the default size, and click Next. k. On the Assign Drive Letter or Path screen, use the drive letter or mount point listed in Table 4 for the volume and click Next. l. On the Format Partition screen: i. In the File system drop-down list, select NTFS. ii. In the Allocation unit size drop-down list, select the value from Table 4. iii. In the Volume label text box, enter the value from Table 4 and click Next. m. Review the settings and click Finish. Once the volumes have been mapped and formatted, perform the following steps: 1. Verify that the odd-numbered SQL Server data volumes are on one controller and the evennumbered SQL Server data volumes are on the other controller. This can be corrected by remapping the volume and specifying the correct controller. 2. Verify that the tempdb data volumes are on different controllers. This can be corrected by remapping the volume and specifying the correct controller. 3. Create a folder named Data on each mount point under M:\ft, with the exception of M:\ft\SQLSystem, by doing the following: a. Open the File Explorer. b. Select the mount point (for example, M:\ft\SQLData01) in the directory tree. c. Right-click the mount point, select New, and select Folder. d. Name the folder Data. e. Repeat until all mount points (except for M:\ft\SQLSystem) have a Data folder. 19 Deploying the 385TB Data Warehouse Fast Track Reference Architecture for Microsoft SQL Server 2017 using Dell EMC PowerEdge R940 and SC9000 | 4033-CD-SQL
-
 1
1 -
2
-
3
-
4
-
5
-
6
-
7
-
8
-
9
-
10
-
11
-
12
-
13
-
 14
14 -
 15
15 -
 16
16 -
 17
17 -
 18
18 -
 19
19 -
 20
20 -
 21
21 -
 22
22 -
 23
23 -
 24
24 -
25
 |
 |
