Dell PowerVault 122T LTO Dell PowerVault 122T SDLT 320 Autoloader User's Guide - Page 15
Diagnostics and Troubleshooting: Dell™ PowerVault™ 122T SDLT 320 Autoloader - autoloader driver
 |
View all Dell PowerVault 122T LTO manuals
Add to My Manuals
Save this manual to your list of manuals |
Page 15 highlights
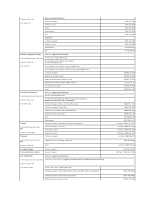
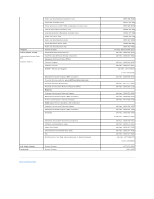
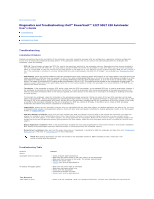
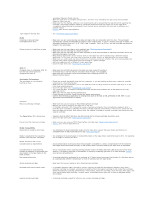
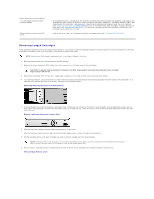
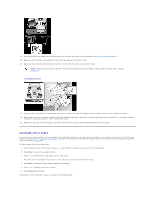
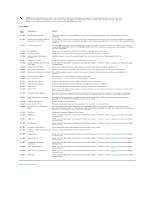
Back to Contents Page Diagnostics and Troubleshooting: Dell™ PowerVault™ 122T SDLT 320 Autoloader User's Guide Troubleshooting Removing Lodged Cartridges Autoloader Error Codes Troubleshooting Installation Problems Problems encountered during the installation of the autoloader are usually caused by improper SCSI bus configuration, application software configuration errors, or by an incorrectly configured operating system. If the application software that you are using is not communicating with the autoloader after installation, check the following: l SCSI ID: The autoloader occupies two SCSI IDs, one for the tape drive, and one for the autoloader robotics. Depending on other devices attached to the same SCSI bus and their SCSI IDs, you may need to change the SCSI ID of either the autoloader or tape drive before you can use the autoloader. Select an unused SCSI ID. See the manuals for the other devices on the SCSI bus or your operating system to determine which SCSI IDs are currently in use. If the autoloader is attached to a narrow (50-pin) SCSI bus (not recommended), only SCSI IDs 0 through 7 are available (see "Changing the SCSI ID"). l SCSI Cabling: Verify that all SCSI cables are securely connected at both ends. Check the length and integrity of your SCSI cabling. The total length of all cables connected to a SCSI bus must not exceed 6 m (19 ft) for a SCSI-1 Single Ended (SE) bus, 3 m (10 ft) for a Fast SCSI (Narrow or Wide) or an Ultra SCSI (Narrow or Wide) SE bus, 12 m (40 ft) for a Low Voltage Differential (LVD) bus with multiple devices, or 25 m (82 ft) for an LVD bus with a single device. The length of the internal SCSI cabling inside the autoloader is 60 cm (2 ft). This length must be included in any calculations of cable length. Try replacing suspect cables with known good cables. Note that it is not recommended to connect the autoloader to a narrow (50-pin) or SE SCSI bus as performance will be restricted. l Termination: If the autoloader is the only SCSI device other than the SCSI host adapter on the selected SCSI bus, it must be terminated. Likewise, if the autoloader is physically the last SCSI device on the SCSI bus, it must be terminated. Only the devices physically at the beginning and end of the SCSI bus should be terminated. Refer to the manuals supplied with other devices on the SCSI bus for information on enabling or disabling termination on those devices. To terminate the autoloader, locate the terminator in the accessories package and press it firmly into either of the two SCSI connectors on the back panel of the autoloader. Secure the terminator by tightening the finger-screws until snug. The supplied terminator is "dual mode" and will work on both LVD and SE (SE is not recommended) SCSI buses. A green LED on the terminator indicates that the unit is attached to a SCSI bus running in LVD mode. A red LED on the terminator indicates that the unit is attached to a SCSI bus running in SE mode. If the LED is not on, check all SCSI and power connections and confirm that the unit is attached to a valid SCSI bus. l Compatibility: Ensure that the autoloader and tape drive are compatible with the SCSI host adapter and backup application you plan to use. For a list of compatible SCSI adapters and application software, check with your SCSI host adapter manufacturer, backup application vendor, or the Dell support website at support.dell.com. l SCSI Host Adapter Installation: Verify that you have installed your SCSI host adapter correctly. Refer to the manual that came with your SCSI host adapter for installation and troubleshooting instructions. Pay particular attention to any steps describing the settings of various jumpers and/or switches on the host adapter, or on newer adapters, the setup application for the adapter. Make sure that the host adapter is properly seated in the system board slot and the operating system correctly detects the host adapter. Make sure that the proper device driver is installed for the SCSI host adapter. l Backup Application Installation: Refer to the documentation included with your backup application for instructions on how to verify proper installation. Most backup software packages require an additional module to communicate with the autoloader robotics. l Device Driver Installation: Make sure that the proper device driver, if applicable, is installed for both the autoloader and tape drive (see "Installing the Device Drivers"). Also refer to "Contacting Dell" for more information. NOTE: Many backup applications use their own drivers for the autoloader and drive. Before installing a driver, make sure it will not be in conflict with the software. Troubleshooting Table Problem Power Autoloader does not power on. No display messages appear. Tape Movement Tape lodged in drive. Solution l Check all power cable connections. l Make sure the power switch on the front panel is in the ON position. l Make sure there is power to the outlet. Try another working outlet. l Replace the power cable. l Contact your service representative. l Make sure the power cable is connected. l Make sure the power switch is on. l Power cycle the autoloader. l Download autoloader firmware. l Contact your service representative. l Power cycle the autoloader, allow it to complete initialization, and then retry unloading the tape using the
-
 1
1 -
2
-
3
-
4
-
5
-
6
-
7
-
8
-
9
-
 10
10 -
 11
11 -
 12
12 -
 13
13 -
 14
14 -
 15
15 -
 16
16 -
 17
17 -
 18
18 -
 19
19 -
 20
20 -
21
-
22
-
23
-
24
-
25
-
26
-
27
-
28
-
29
-
30
-
31
-
32
-
33
-
34
-
35
-
36
-
37
-
38
-
39
 |
 |