Dell PowerVault 122T LTO Dell PowerVault 122T SDLT 320 Autoloader User's Guide - Page 17
Removing Lodged Cartridges
 |
View all Dell PowerVault 122T LTO manuals
Add to My Manuals
Save this manual to your list of manuals |
Page 17 highlights
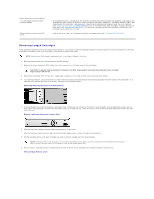
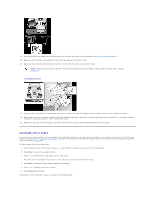
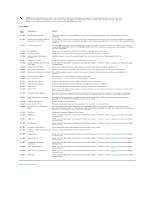
Errors Displayed on Front Panel "!" in autoloader operator panel inventory display There is an error code on the LCD screen l An exclamation point (!) displayed in the inventory indicates that the autoloader has identified a cartridge in the indicated slot that is either an invalid or faulty catridge or has had a media error. The Media Attention LED is also illuminated in this case (see "LED Indicators"). Exporting the indicated cartridge will clear the error condition (see "Exporting Cartridges"). If these symptoms occur on multiple known good cartridges, consider cleaning the tape drive (see "Cleaning the Tape Drive"). If a particular cartridge causes these symptoms repeatedly, that cartridge may be defective or invalid. l Look up the error code, try to resolve the failure, and power cycle (see "Autoloader Error Codes"). Removing Lodged Cartridges If the autoloader experiences a severe mechanical problem or if you need to remove cartridges because of a power failure or other circumstance in which the autoloader is unable to export the cartridges in the carousel, follow these steps: NOTE: Contact your Dell support representative if a cartridge is lodged in the drive. 1. Move the power switch on the front panel to the OFF position. 2. Remove the power cable and SCSI cables from their connectors on the back panel of the autoloader. CAUTION: To prevent injury, disconnect the power and SCSI cables before removing the autoloader cover and keep fingers away from the fan. 3. Remove the autoloader from its rack slot, if applicable, and place it on a table or other clean and level work surface. 4. In a rackmounted unit, use a screwdriver to remove the front cover screws that secure the mounting brackets from both sides of the autoloader. In a table top unit, remove the front cover screws there are no mounting brackets. Removing Mounting Brackets (Left Side Shown) 5. If the autoloader has mounting brackets (rackmount unit), remove the five screws on the back of the autoloader, and two additional screws, one on each side of the autoloader, to loosen the autoloader cover. In a table top unit, remove the front cover screws and three additional screws from each side of the unit. Remove Indicated Back Cover Screws Only 6. Slide the top cover towards the back before attempting to lift the cover. 7. After the top cover hooks clear the edge of the front panel display cover, remove the top cover by lifting it. 8. Lift the cartridge carrier, with each cartridge you want to remove, straight up from the autoloader. NOTE: To remove the carrier directly in front of the Import/Export slot, gently rotate the carousel counterclockwise by moving the belt or carriers until the carrier is no longer in front of the Import/Export slot. 9. On each carrier, carefully pull the cartridge lock lever away from the carrier, allowing the cartridge to slide out of the carrier. Pull Cartridge Release Lever
-
 1
1 -
2
-
3
-
4
-
5
-
6
-
7
-
8
-
9
-
10
-
11
-
 12
12 -
 13
13 -
 14
14 -
 15
15 -
 16
16 -
 17
17 -
 18
18 -
 19
19 -
 20
20 -
 21
21 -
 22
22 -
23
-
24
-
25
-
26
-
27
-
28
-
29
-
30
-
31
-
32
-
33
-
34
-
35
-
36
-
37
-
38
-
39
 |
 |
