Dell PowerVault 122T LTO Dell PowerVault 122T SDLT 320 Autoloader User's Guide - Page 33
Importing Cartridges, Exporting Cartridges, Loading Cartridges
 |
View all Dell PowerVault 122T LTO manuals
Add to My Manuals
Save this manual to your list of manuals |
Page 33 highlights
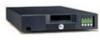
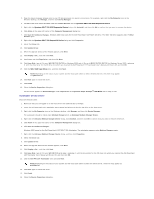
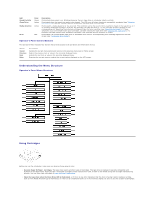
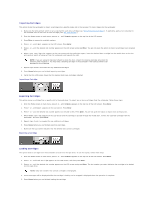
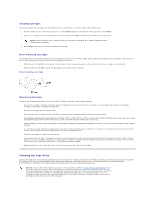
Importing Cartridges This option forces the autoloader to import a cartridge into a specific empty slot in the carousel. To import tapes into the autoloader: 1. Make sure the write-protect switch is set as desired for each data cartridge (see "Write-Protecting Cartridges"). If applicable, apply a bar code label to the recessed area on the front of each cartridge (see "Bar Code Reader"). 2. From the Home screen or main menu, press + or - until Commands appears on the top line of the LCD screen. 3. Press Enter to access the available options. 4. Press + or - until Import appears on the LCD screen. Press Enter. 5. Press + or - until the desired slot number appears on the LCD screen and press Enter. You are not given the option to import a cartridge to an occupied slot. 6. When Insert Cartridge Slot appears on the LCD screen and the media door opens, insert the desired data cartridge into the media door so that the write-protect switch is facing out from the autoloader and towards the right. NOTE: If you are using the Operator's Panel to clean the drive, import the cleaning cartridge only when the operator panel requests it. You may keep a cleaning cartridge in the autoloader if the backup software can manage the drive cleaning. 7. Repeat steps 5 and 6 as needed for any additional cartridges. 8. Press Cancel when you are finished importing cartridges. 9. Verify that the LCD screen shows that the desired slots have cartridges installed. Importing a Cartridge Exporting Cartridges This option moves a cartridge from a specific slot to the media door. To export one or more cartridges from the autoloader, follow these steps: 1. From the Home screen or main menu, press + or - until Commands appears on the top line of the LCD screen. Press Enter. 2. Press + or - until Export appears on the LCD screen. Press Enter. 3. Press + or - until the desired slot number appears on the LCD screen. Press Enter. You are not given the option to export from an empty slot. 4. When Remove Cartridge appears on the LCD screen and the cartridge is ejected through the media door, remove the exported cartridge from the autoloader, and then press Enter. 5. Repeat steps 3 and 4 as needed for any additional cartridges. 6. Press Cancel when you are finished exporting cartridges. 7. Make sure the LCD screen indicates that the desired slots contain cartridges. Exporting a Cartridge Loading Cartridges This option loads a cartridge from the autoloader carousel into the tape drive. To use this option, follow these steps: 1. From the Home screen or main menu, press + or - until Commands appears on the top line of the LCD screen. Press Enter. 2. Press + or - until Load Cartridge appears on the LCD screen, and then press Enter. 3. Press + or - until the desired slot number appears on the LCD screen and press Enter. The slot number you select indicates the cartridge to be loaded into the tape drive. NOTE: Only slot numbers that contain cartridges are displayed. 4. Status messages will be displayed while the cartridge is loading. Drive Stopped is displayed when the operation is complete. 5. Press Cancel when you are finished loading the cartridge.
-
 1
1 -
2
-
3
-
4
-
5
-
6
-
7
-
8
-
9
-
10
-
11
-
12
-
13
-
14
-
15
-
16
-
17
-
18
-
19
-
20
-
21
-
22
-
23
-
24
-
25
-
26
-
27
-
 28
28 -
 29
29 -
 30
30 -
 31
31 -
 32
32 -
 33
33 -
 34
34 -
 35
35 -
 36
36 -
 37
37 -
 38
38 -
39
 |
 |