Dell PowerVault 122T LTO Dell PowerVault 122T SDLT 320 Autoloader User's Guide - Page 24
Installing the Autoloader: Dell™ PowerVault™ 122T SDLT 320 Autoloader User's - 2 autoloader drivers
 |
View all Dell PowerVault 122T LTO manuals
Add to My Manuals
Save this manual to your list of manuals |
Page 24 highlights
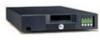
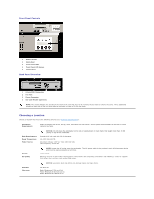
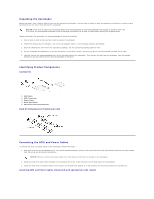
Back to Contents Page Installing the Autoloader: Dell™ PowerVault™ 122T SDLT 320 Autoloader User's Guide Installation Overview Understanding Autoloader Features Bar Code Reader SCSI Requirements Product Overview Choosing a Location Unpacking the Autoloader Identifying Product Components Connecting the SCSI and Power Cables Preparing the Host and Verifying the Connection Installing the Device Drivers Installation Overview Installing the autoloader consists of the following steps, which are explained in more detail later in this section: 1. Choose a location for the autoloader (see "Choosing a Location"). 2. Unpack and check the autoloader for shipping damage (see "Unpacking the Autoloader"). 3. Identify the accessories that come with the autoloader (see "Identifying Product Components"). 4. Install the autoloader in a computer rack or select a table or desk top near the host server. If installing a rack mount unit, refer to your rack Installation Guide. 5. Shut down, turn off, and remove power from the server and all devices attached to the server (see "Connecting the SCSI and Power Cables"). 6. Attach the SCSI cable to the autoloader and server's SCSI host adapter (see "Connecting the SCSI and Power Cables"). 7. Attach the power cable to the autoloader and plug in the power cable to the nearest power outlet (see "Connecting the SCSI and Power Cables"). Power the autoloader on to ensure that it passes the Power-on Self Test. 8. Set the SCSI ID for the autoloader and/or tape drive (see "Changing the SCSI IDs"). 9. Set up the host and verify the connection (see "Preparing the Host and Verifying the Connection"). Understanding Autoloader Features The autoloader is a SCSI-2 Low Voltage Differential (LVD) data storage device that incorporates a Dell PowerVault 122T SDLT 320 tape drive and eight tape slots. The autoloader occupies two SCSI target addresses, one for the tape drive and the other for the autoloader robotics. The autoloader uses up to eight Super DLTtape I data cartridges, providing a maximum formatted capacity of 2.56 Terabytes and a sustained data transfer rate as high as 1.92 GB per minute, assuming a 2:1 compression ratio. The autoloader is compatible with most operating systems and environments that support the SCSI interface, but it requires either direct support from the operating system or a compatible backup application to take full advantage of its many features. Bar Code Reader Your autoloader may have come equipped with an optional bar code reader. The bar code reader is enclosed in a plastic housing that protrudes out the back panel of the autoloader, just above the SCSI connectors. The bar code reader automatically scans each cartridge in the carousel upon power-up, after a reset, after an import or an export, or when a re-inventory command is issued (see "Creating an Inventory of Cartridges"). Beyond that, there is no user interface with the bar code reader via the front panel operator controls or LCD screen. The information from each label is stored in memory and available through SCSI to the computer's operating system or backup application upon request. If utilizing the bar code reader, you must apply bar code labels to the recessed area on the front of each cartridge. The labels must conform to ANSI/AIM BC11995 Uniform Symbology Specification Code 39. A set of bar code labels is included with the autoloader. Refer to www.dell.com for information on obtaining additional bar code labels. SCSI Requirements The autoloader incorporates a wide SCSI-2, LVD SCSI bus. Make sure your SCSI host adapter or controller supports these standards. The autoloader can be attached to a Single Ended (SE) SCSI bus, but this is not recommended because it restricts performance. If you connect the autoloader to an SE SCSI bus or if there are SE devices attached to the same SCSI bus, the autoloader's performance is limited to the maximum data transfer speed and maximum cable lengths of the SE bus. The autoloader is NOT compatible with a standard differential (Diff) or High Voltage Differential (HVD) SCSI bus. The autoloader can be attached to a narrow (50-pin) SCSI bus, but this is not recommended as performance will be restricted. Attaching to a narrow (50-pin) bus requires a customer-supplied 68-pin to 50-pin adapter that terminates the unused 18 pins. These adapters are sometimes labeled high-byte termination. Product Overview
-
 1
1 -
2
-
3
-
4
-
5
-
6
-
7
-
8
-
9
-
10
-
11
-
12
-
13
-
14
-
15
-
16
-
17
-
18
-
 19
19 -
 20
20 -
 21
21 -
 22
22 -
 23
23 -
 24
24 -
 25
25 -
 26
26 -
 27
27 -
 28
28 -
 29
29 -
30
-
31
-
32
-
33
-
34
-
35
-
36
-
37
-
38
-
39
 |
 |