Dell Precision 210 Dell Precision WorkStation 210 Desktop Systems User's Guide - Page 128
See Using the System Setup Program.
 |
View all Dell Precision 210 manuals
Add to My Manuals
Save this manual to your list of manuals |
Page 128 highlights
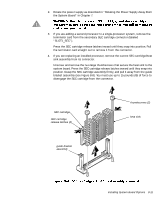
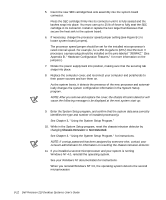
5. Insert the new SEC cartridge/heat sink assembly into the system board connector. Press the SEC cartridge firmly into its connector until it is fully seated and the latches snap into place. You must use up to 25 lb of force to fully seat the SEC cartridge in its connector. Install or replace the two large thumbscrews that secure the heat sink to the system board. 6. If necessary, change the processor speed jumper setting (see Figure B-1 to locate system board jumpers). The processor speed jumper should be set for the installed microprocessor's rated internal speed. For example, for a 350-megahertz (MHz) Intel Pentium II processor, a jumper plug should be installed on the pins labeled "350MHZ." (See Appendix B, "Hardware Configuration Features," for more information on the jumpers.) 7. Rotate the power supply back into position, making sure that the securing tab snaps into place. 8. Replace the computer cover, and reconnect your computer and peripherals to their power sources and turn them on. As the system boots, it detects the presence of the new processor and automatically changes the system configuration information in the System Setup program. NOTE: After you remove and replace the cover, the chassis intrusion detector will cause the following message to be displayed at the next system start-up: ALERT! Cover was previously removed. 9. Enter the System Setup program, and confirm that the system data area correctly identifies the type and number of installed processor(s). See Chapter 3, "Using the System Setup Program." 10. While in the System Setup program, reset the chassis intrusion detector by changing Chassis Intrusion to Not Detected. See Chapter 3, "Using the System Setup Program," for instructions. NOTE: If a setup password has been assigned by someone else, contact your network administrator for information on resetting the chassis intrusion detector. 11. If you installed a second microprocessor and your system is running Windows NT 4.0, reinstall the operating system. See your Windows NT documentation for instructions. When you reinstall Windows NT 4.0, the operating system detects the second microprocessor. 8-12 Dell Precision 210 Desktop Systems User's Guide
-
 1
1 -
2
-
3
-
4
-
5
-
6
-
7
-
8
-
9
-
10
-
11
-
12
-
13
-
14
-
15
-
16
-
17
-
18
-
19
-
20
-
21
-
22
-
23
-
24
-
25
-
26
-
27
-
28
-
29
-
30
-
31
-
32
-
33
-
34
-
35
-
36
-
37
-
38
-
39
-
40
-
41
-
42
-
43
-
44
-
45
-
46
-
47
-
48
-
49
-
50
-
51
-
52
-
53
-
54
-
55
-
56
-
57
-
58
-
59
-
60
-
61
-
62
-
63
-
64
-
65
-
66
-
67
-
68
-
69
-
70
-
71
-
72
-
73
-
74
-
75
-
76
-
77
-
78
-
79
-
80
-
81
-
82
-
83
-
84
-
85
-
86
-
87
-
88
-
89
-
90
-
91
-
92
-
93
-
94
-
95
-
96
-
97
-
98
-
99
-
100
-
101
-
102
-
103
-
104
-
105
-
106
-
107
-
108
-
109
-
110
-
111
-
112
-
113
-
114
-
115
-
116
-
117
-
118
-
119
-
120
-
121
-
122
-
 123
123 -
 124
124 -
 125
125 -
 126
126 -
 127
127 -
 128
128 -
 129
129 -
 130
130 -
 131
131 -
 132
132 -
 133
133 -
134
-
135
-
136
-
137
-
138
-
139
-
140
-
141
-
142
-
143
-
144
-
145
-
146
-
147
-
148
-
149
-
150
-
151
-
152
-
153
-
154
-
155
-
156
-
157
-
158
-
159
-
160
-
161
-
162
-
163
-
164
-
165
-
166
-
167
-
168
-
169
-
170
-
171
-
172
-
173
-
174
-
175
-
176
-
177
-
178
-
179
-
180
-
181
-
182
-
183
-
184
-
185
-
186
-
187
-
188
-
189
-
190
-
191
-
192
-
193
-
194
-
195
-
196
-
197
-
198
-
199
-
200
-
201
-
202
-
203
-
204
-
205
-
206
-
207
-
208
-
209
-
210
-
211
-
212
-
213
-
214
-
215
-
216
-
217
-
218
-
219
-
220
-
221
-
222
-
223
-
224
-
225
-
226
-
227
-
228
-
229
-
230
-
231
-
232
-
233
-
234
 |
 |
