Dell Precision 420 System Documentation Update (Memory Upgrade) - Page 11
Installing a RIMM, Installing a RIMM - open
 |
View all Dell Precision 420 manuals
Add to My Manuals
Save this manual to your list of manuals |
Page 11 highlights
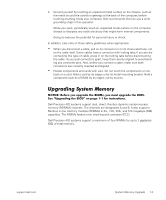
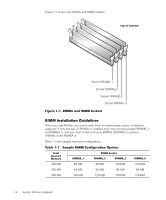
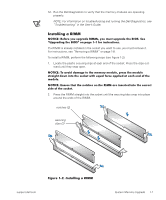
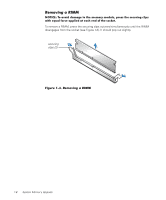
12. Run the Dell Diagnostics to verify that the memory modules are operating properly. NOTE: For information on troubleshooting and running the Dell Diagnostics, see "Troubleshooting" in the User's Guide. Installing a RIMM NOTICE: Before you upgrade RIMMs, you must upgrade the BIOS. See "Upgrading the BIOS" on page 1-1 for instructions. If a RIMM is already installed in the socket you want to use, you must remove it. For instructions, see "Removing a RIMM" on page 1-8. To install a RIMM, perform the following steps (see Figure 1-2). 1. Locate the plastic securing clips at each end of the socket. Press the clips out- ward until they snap open. NOTICE: To avoid damage to the memory module, press the module straight down into the socket with equal force applied at each end of the module. NOTICE: Ensure that the notches on the RIMM are inserted into the correct side of the socket. 2. Press the RIMM straight into the socket until the securing tabs snap into place around the ends of the RIMM. notches (2) securing clips (2) Figure 1-2. Installing a RIMM support.dell.com System Memory Upgrade 1-7
-
 1
1 -
2
-
3
-
4
-
5
-
 6
6 -
 7
7 -
 8
8 -
 9
9 -
 10
10 -
 11
11 -
 12
12 -
 13
13 -
 14
14 -
 15
15 -
 16
16 -
17
-
18
-
19
-
20
-
21
-
22
-
23
-
24
-
25
-
26
-
27
-
28
-
29
-
30
-
31
-
32
-
33
-
34
-
35
-
36
-
37
-
38
-
39
-
40
-
41
-
42
 |
 |