Dell Precision 420 System Documentation Update (Memory Upgrade) - Page 6
Precautionary Measures, Before Removing the Cover - power
 |
View all Dell Precision 420 manuals
Add to My Manuals
Save this manual to your list of manuals |
Page 6 highlights
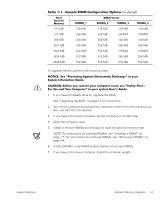
e. Select FlashBIOS Updates for the download category. f. Click Go and follow the instructions on screen to create a diskette containing the BIOS update files. NOTE: For some Dell systems, you are given a choice to create a diskette containing the BIOS update files or to download a file you can use from the hard drive. Select the choice to use the file that creates an installation diskette. 2. Insert the BIOS update diskette into the diskette drive of the computer to be updated. Then restart the computer. The computer automatically updates the BIOS from the diskette. 3. When the computer begins to restart and the Dell logo screen appears, remove the diskette from the diskette drive so that the computer does not boot from the diskette again. Precautionary Measures NOTICE: Before you upgrade the RIMMs, you must upgrade the BIOS. See "Upgrading the BIOS" on page 1-1 for instructions. Before you perform any of the procedures in this document, read the following notice for your personal safety and to prevent damage to the system from electrostatic discharge (ESD). NOTICE: The procedure in this document requires that you remove the cover and work inside your computer. Do not attempt to service the computer except as explained in this document and elsewhere in Dell documentation. Always follow installation and service instructions closely. Before Removing the Cover Before you remove the computer cover, perform the following steps in the sequence indicated. NOTICE: To help avoid possible damage to the system board, unplug your computer system and wait 15 to 30 seconds before removing a component from the system board or disconnecting a peripheral device from the computer. 1. Turn off the computer and any peripherals. 2. Disconnect the computer and peripherals from their power sources. Also, disconnect any telephone or telecommunication lines from the computer. Before disconnecting a peripheral from the computer or removing a component from the system board, verify that the standby power light, located on the system board, has turned off. If it is on, you may need to wait 15 to 30 seconds for it to go out (see the internal system board label that is attached to the cover of your computer). 1-2 System Memory Upgrade
-
 1
1 -
 2
2 -
 3
3 -
 4
4 -
 5
5 -
 6
6 -
 7
7 -
 8
8 -
 9
9 -
 10
10 -
 11
11 -
 12
12 -
13
-
14
-
15
-
16
-
17
-
18
-
19
-
20
-
21
-
22
-
23
-
24
-
25
-
26
-
27
-
28
-
29
-
30
-
31
-
32
-
33
-
34
-
35
-
36
-
37
-
38
-
39
-
40
-
41
-
42
 |
 |