Dell Precision 420 System Documentation Update (Memory Upgrade) - Page 9
Table 1-1., Sample RIMM Configuration Options, For You and Your Computer - bios
 |
View all Dell Precision 420 manuals
Add to My Manuals
Save this manual to your list of manuals |
Page 9 highlights
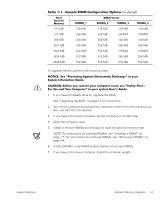
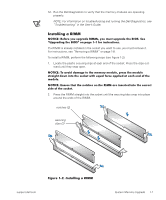
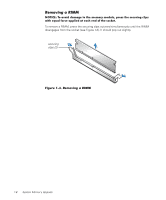
Table 1-1. Sample RIMM Configuration Options (continued) Total Desired Memory RIMMB_1 RIMM Socket RIMMA_2 RIMMB_3 RIMMA_4 512 MB 128 MB 128 MB 128 MB 128 MB 512 MB 256 MB 256 MB CRIMM CRIMM 768 MB 256 MB 256 MB 128 MB 128 MB 1024 MB 256 MB 256 MB 256 MB 256 MB 1024 MB 512 MB 512 MB CRIMM CRIMM 1536 MB 512 MB 512 MB 256 MB 256 MB 2048 MB 512 MB 512 MB 512 MB 512 MB To upgrade memory, perform the following steps. NOTICE: See "Protecting Against Electrostatic Discharge" in your System Information Guide. CAUTION: Before you remove your computer cover, see "Safety First- For You and Your Computer" in your system User's Guide. 1. If you have not already done so, upgrade the BIOS. See "Upgrading the BIOS" on page 1-1 for instructions. 2. Turn off the computer and peripherals, disconnect them from their electrical outlets, and wait 10 to 20 seconds. 3. If you have a mini-tower computer, lay the computer on its right side. 4. Open the computer cover. 5. Install or remove RIMMs as necessary to reach the desired memory total. NOTE: For instructions on installing RIMMs, see "Installing a RIMM" on page 1-7. For instructions on removing RIMMs, see "Removing a RIMM" on page 1-8. 6. Install CRIMMs in any RIMM sockets that do not contain RIMMs. 7. If you have a mini-tower computer, stand the computer upright. support.dell.com System Memory Upgrade 1-5
-
 1
1 -
2
-
3
-
 4
4 -
 5
5 -
 6
6 -
 7
7 -
 8
8 -
 9
9 -
 10
10 -
 11
11 -
 12
12 -
 13
13 -
 14
14 -
15
-
16
-
17
-
18
-
19
-
20
-
21
-
22
-
23
-
24
-
25
-
26
-
27
-
28
-
29
-
30
-
31
-
32
-
33
-
34
-
35
-
36
-
37
-
38
-
39
-
40
-
41
-
42
 |
 |