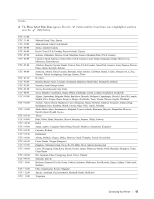
Dell S2810dn Smart Dell Smart Printer Users Guide - Page 58
Setting Up the Printer in Another Connection Method, Dell Printer Easy Install, Finish, Ready to Print
 |
View all Dell S2810dn Smart manuals
Add to My Manuals
Save this manual to your list of manuals |
Page 58 highlights
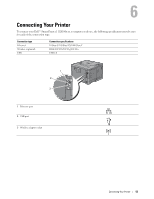
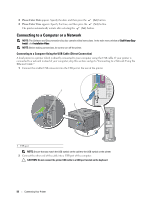
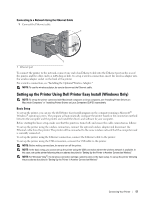
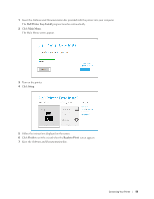
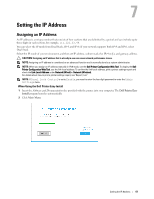
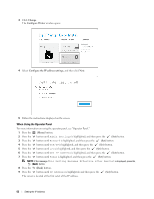
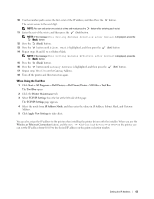
1 Insert the Software and Documentation disc provided with the printer into your computer. The Dell Printer Easy Install program launches automatically. NOTE: If the Dell Printer Easy Install program does not launch automatically, follow the procedure below. For Windows Server® 2008 and Windows Server® 2008 R2 Click Start Run, enter D:\setup_assist.exe (where D is the drive letter of the optical drive) in the Run dialog box, and then click OK. For Windows Vista® and Windows® 7 Click Start All Programs Accessories Run, enter D:\setup_assist.exe (where D is the drive letter of the optical drive) in the Run dialog box, and then click OK. For Windows® 8, Windows® 8.1, Windows Server® 2012, and Windows Server® 2012 R2 Point to the top or bottom right corner of the screen, and then click Search Type Run in the search box, click Apps (for Windows® 8 and Windows Server® 2012 only), and then click Run Type D:\setup_assist.exe (where D is the drive letter of the optical drive), and then click OK. 2 Turn on the printer. 3 Wait until the screen changes or click Next. Follow the instructions displayed on the screen. 4 Click Finish to exit the wizard when the Ready to Print! screen appears. 5 Eject the Software and Documentation disc. If the Main Menu of Dell Printer Easy Install Appears Without Starting or Completing the Basic Setup Set up the printer following the procedures described in "Setting Up the Printer in Another Connection Method." Setting Up the Printer in Another Connection Method You can set up the printer, specifying the connection method other than the one used in the basic setup. Before starting the setup procedure below, make sure that the printer is turned off, and ensure the cable connection as described in "Basic Setup." 58 Connecting Your Printer
-
 1
1 -
2
-
3
-
4
-
5
-
6
-
7
-
8
-
9
-
10
-
11
-
12
-
13
-
14
-
15
-
16
-
17
-
18
-
19
-
20
-
21
-
22
-
23
-
24
-
25
-
26
-
27
-
28
-
29
-
30
-
31
-
32
-
33
-
34
-
35
-
36
-
37
-
38
-
39
-
40
-
41
-
42
-
43
-
44
-
45
-
46
-
47
-
48
-
49
-
50
-
51
-
52
-
 53
53 -
 54
54 -
 55
55 -
 56
56 -
 57
57 -
 58
58 -
 59
59 -
 60
60 -
 61
61 -
 62
62 -
 63
63 -
64
-
65
-
66
-
67
-
68
-
69
-
70
-
71
-
72
-
73
-
74
-
75
-
76
-
77
-
78
-
79
-
80
-
81
-
82
-
83
-
84
-
85
-
86
-
87
-
88
-
89
-
90
-
91
-
92
-
93
-
94
-
95
-
96
-
97
-
98
-
99
-
100
-
101
-
102
-
103
-
104
-
105
-
106
-
107
-
108
-
109
-
110
-
111
-
112
-
113
-
114
-
115
-
116
-
117
-
118
-
119
-
120
-
121
-
122
-
123
-
124
-
125
-
126
-
127
-
128
-
129
-
130
-
131
-
132
-
133
-
134
-
135
-
136
-
137
-
138
-
139
-
140
-
141
-
142
-
143
-
144
-
145
-
146
-
147
-
148
-
149
-
150
-
151
-
152
-
153
-
154
-
155
-
156
-
157
-
158
-
159
-
160
-
161
-
162
-
163
-
164
-
165
-
166
-
167
-
168
-
169
-
170
-
171
-
172
-
173
-
174
-
175
-
176
-
177
-
178
-
179
-
180
-
181
-
182
-
183
-
184
-
185
-
186
-
187
-
188
-
189
-
190
-
191
-
192
-
193
-
194
-
195
-
196
-
197
-
198
-
199
-
200
-
201
-
202
-
203
-
204
-
205
-
206
-
207
-
208
-
209
-
210
-
211
-
212
-
213
-
214
-
215
-
216
-
217
-
218
-
219
-
220
-
221
-
222
-
223
-
224
-
225
-
226
-
227
-
228
-
229
-
230
-
231
-
232
-
233
-
234
-
235
-
236
-
237
-
238
-
239
-
240
-
241
-
242
-
243
-
244
-
245
-
246
-
247
-
248
-
249
-
250
-
251
-
252
-
253
-
254
-
255
-
256
-
257
-
258
-
259
-
260
-
261
-
262
-
263
-
264
-
265
-
266
-
267
-
268
-
269
-
270
-
271
-
272
-
273
-
274
-
275
-
276
-
277
-
278
-
279
-
280
-
281
-
282
-
283
-
284
-
285
-
286
-
287
-
288
-
289
-
290
-
291
-
292
-
293
-
294
-
295
-
296
-
297
-
298
-
299
-
300
-
301
-
302
-
303
-
304
-
305
-
306
-
307
-
308
-
309
-
310
-
311
-
312
-
313
-
314
-
315
-
316
 |
 |