Dell S3219D 3219D Monitor Users Guide - Page 26
Wall Mounting (Optional), Setting up the monitor
 |
View all Dell S3219D manuals
Add to My Manuals
Save this manual to your list of manuals |
Page 26 highlights
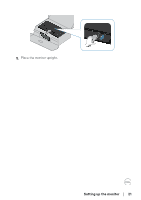
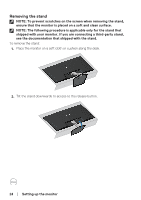
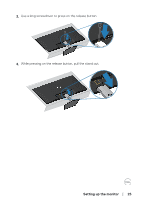
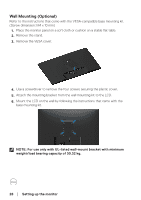
Wall Mounting (Optional) Refer to the instructions that come with the VESA-compatible base mounting kit. (Screw dimension: M4 x 10 mm) 1. Place the monitor panel on a soft cloth or cushion on a stable flat table. 2. Remove the stand. 3. Remove the VESA cover. 4. Use a screwdriver to remove the four screws securing the plastic cover. 5. Attach the mounting bracket from the wall mounting kit to the LCD. 6. Mount the LCD on the wall by following the instructions that came with the base mounting kit. DELL S3219D Flat Panel Monitor Model: S3219Dc Input Rating :100-240V Made in China 50/60Hz,1.5A Date of Mfg Aug. 2018 SVC Tag: 1234567 Express Service Code: 123 456 789 0 S/N: CN-0YNW31 -TV100-888-001U A00 Q40G032N-700-02A DELL S3219D Flat Panel Monitor /Monitor Plano Panel /Moniteur écran plat Model No. /Modelo /N°de modelo /型號: S3219Dc Input Rating /Entrade /Daya Tegangan:100-240V 50/60Hz,1.5A 100-240伏特,1.5安培,50/60赫茲 CAN ICES-3 (B)/NMB-3(B Fabriqué en Chine www.dell.com/regulatory_compliance This device complies with part 15 of the FCC Rules. Operation is subject to the following two conditions: (1) this device may not cause harmful interference, and (2) this device must accept any interference received, including interference that may cause undesired operation. NOTE: For use only with UL-listed wall-mount bracket with minimum weight/load bearing capacity of 30.32 kg. 26 │ Setting up the monitor
-
 1
1 -
2
-
3
-
4
-
5
-
6
-
7
-
8
-
9
-
10
-
11
-
12
-
13
-
14
-
15
-
16
-
17
-
18
-
19
-
20
-
 21
21 -
 22
22 -
 23
23 -
 24
24 -
 25
25 -
 26
26 -
 27
27 -
 28
28 -
 29
29 -
 30
30 -
 31
31 -
32
-
33
-
34
-
35
-
36
-
37
-
38
-
39
-
40
-
41
-
42
-
43
-
44
-
45
-
46
-
47
-
48
-
49
-
50
-
51
-
52
-
53
-
54
-
55
-
56
 |
 |
