Dell S4148F-ON Open Networking Hardware Diagnostic Guide June 2018 - Page 8
ONIE and Dell EMC OS installation instructions, ONIE expansion, DIAG-OS installation - console
 |
View all Dell S4148F-ON manuals
Add to My Manuals
Save this manual to your list of manuals |
Page 8 highlights
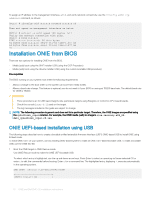
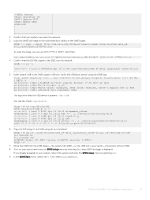
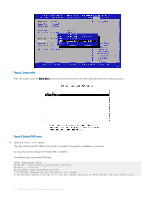
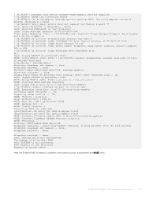
2 ONIE and Dell EMC OS installation instructions This section describes the different methods to install ONIE and the Dell EMC OS on your system. NOTE: After installing the networking operating software (NOS) and diagnostics operating system (DIAG-OS), if you boot into ONIE Install mode, ONIE assumes ownership of the system; ONIE Install mode is sticky. In this situation, ONIE stays in Install mode until NOS and DIAG-OS are successfully installed again. If you want to boot into ONIE for any reason other than installation, use Rescue mode or Update mode. NOTE: To access ONIE, use the RJ-45 console port. ONIE expansion To view all the ONIE commands available, from the ONIE prompt, enter onie- and click twice. ONIE:/ # onie- onie-boot-mode onie-fwpkg onie-console onie-nos-install onie-discovery-start onie-self-update onie-discovery-stop onie-support onie-syseeprom onie-sysinfo onie-uninstaller Topics: • DIAG-OS installation • ONIE and DIAG OS installation • ONIE service discovery and OS installation • Installation ONIE from BIOS DIAG-OS installation NOTE: If you have a recovery USB plugged into your system, you must remove it before installing the DIAG-OS. 1 Assign an IP address to the management interface. Confirm you can reach the network. 2 Install the DIAG-OS from the ONIE prompt using the following command: ONIE:/ # onie-nos-install tftp://x.x.x.x/diag-installer-x86_64-dell__-r0.bin After the DIAG-OS installs, the system reboots and displays following menu: NOTE: By default, the system boots in DIAG-OS mode. GNU GRUB version 2.02~beta2+e4a1fe391 |*EDA-DIAG | | ONIE | | | | | | | 8 ONIE and Dell EMC OS installation instructions
-
 1
1 -
2
-
 3
3 -
 4
4 -
 5
5 -
 6
6 -
 7
7 -
 8
8 -
 9
9 -
 10
10 -
 11
11 -
 12
12 -
 13
13 -
14
-
15
-
16
-
17
-
18
-
19
-
20
-
21
-
22
-
23
-
24
-
25
-
26
-
27
-
28
-
29
-
30
-
31
-
32
-
33
-
34
-
35
-
36
-
37
-
38
-
39
-
40
-
41
-
42
-
43
-
44
-
45
-
46
-
47
-
48
-
49
-
50
-
51
-
52
-
53
-
54
-
55
-
56
-
57
-
58
-
59
-
60
-
61
-
62
-
63
-
64
-
65
-
66
-
67
-
68
-
69
-
70
-
71
-
72
-
73
-
74
-
75
-
76
-
77
-
78
-
79
-
80
-
81
-
82
-
83
-
84
-
85
-
86
 |
 |