Dell S4148U-ON EMC PowerSwitch S4100–ON Series Installation Guide M - Page 25
U Tool-less mount installation, Separate rails, U tool-less installation
 |
View all Dell S4148U-ON manuals
Add to My Manuals
Save this manual to your list of manuals |
Page 25 highlights
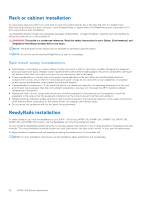
Figure 16. Separate rails 1U Tool-less mount installation NOTE: For more installation instructions, see the installation labels attached to the rail assembly. 1. Face the ReadyRails flange ears facing outward. Place one rail between the left and right vertical posts. Align and seat the back flange rail pegs in the back vertical post flange. The center extractions show how the pegs appear in both the square and nonthreaded round holes. Figure 17. 1U tool-less installation S4100-ON Series installation 25
-
 1
1 -
2
-
3
-
4
-
5
-
6
-
7
-
8
-
9
-
10
-
11
-
12
-
13
-
14
-
15
-
16
-
17
-
18
-
19
-
 20
20 -
 21
21 -
 22
22 -
 23
23 -
 24
24 -
 25
25 -
 26
26 -
 27
27 -
 28
28 -
 29
29 -
 30
30 -
31
-
32
-
33
-
34
-
35
-
36
-
37
-
38
-
39
-
40
-
41
-
42
-
43
-
44
-
45
-
46
-
47
-
48
-
49
 |
 |

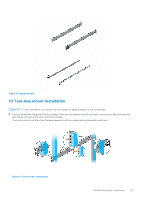
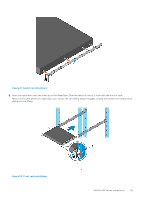
Figure 16. Separate rails
1U Tool-less mount installation
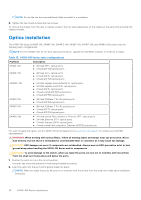
NOTE:
For more installation instructions, see the installation labels attached to the rail assembly.
1.
Face the ReadyRails flange ears facing outward. Place one rail between the left and right vertical posts. Align and seat the
back flange rail pegs in the back vertical post flange.
The center extractions show how the pegs appear in both the square and nonthreaded round holes.
Figure 17. 1U tool-less installation
S4100–ON Series installation
25