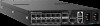
Dell S5212F-ON Open Networking Hardware Diagnostic Guide December 2021 - Page 16
Dell EMC DIAG OS, DIAG OS installation or update
 |
View all Dell S5212F-ON manuals
Add to My Manuals
Save this manual to your list of manuals |
Page 16 highlights
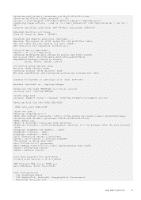
5 Dell EMC DIAG OS These sections describe the Dell EMC diagnostics. These instructions apply to systems where ONIE diagnostics are not available. Topics: • DIAG OS installation or update • View DIAG versions • View CPLD versions • Restore factory defaults DIAG OS installation or update Load or update the DIAG-OS-the diag installer image-using the onie-nos-install command. The DIAG-OS installer runs in two modes: Update mode or Install mode. ● In Update mode, the DIAG-OS updates the existing DIAG-OS and boots back to ONIE. ● In Install mode, the DIAG-OS erases the existing DIAG-OS and loads the new DIAG-OS. NOTE: If you have a recovery USB plugged into your system, remove it before using the onie-nos-install command. NOTE: Before you begin, go to www.dell.com/support and download the diagnostic package. 1. Enter the onie-discovery-stop command to stop ONIE Discovery mode. 2. Assign an IP address to the management interface and verify the network connectivity. ONIE:/ # ifconfig eth0 xx.xx.xx.xx netmask xxx.xxx.x.x up ONIE:/ # ifconfig eth0 Link encap:Ethernet HWaddr 34:17:EB:05:B4:00 inet addr:xx.xx.xx.xx Bcast:xx.xx.xxx.xxx Mask:xxx.xxx.x.x inet6 addr: fe80::3617:ebff:fe05:b400/64 Scope:Link UP BROADCAST RUNNING MULTICAST MTU:1500 Metric:1 RX packets:43 errors:0 dropped:0 overruns:0 frame:0 TX packets:31 errors:0 dropped:0 overruns:0 carrier:0 collisions:0 txqueuelen:1000 RX bytes:5118 (4.9 KiB) TX bytes:7104 (6.9 KiB) Memory:dff40000-dff5ffff 3. Upgrade the DIAG Installer. NOTE: In Install mode, the DIAG-OS installation removes any existing NOS and DIAG-OS partition. If you do not create file /tmp/diag_os_install_mode, the DIAG-OS installs in Upgrade mode. In this case, the installation process does NOT touch any existing NOS. NOTE: The Z9432F-ON switch has the Secure Boot feature. For this feature only, the .bin file is replaced with the .tar file. The .tar archive file has both the .bin file and the .sig file to verify the secure boot .bin file. You do not have to untar the .tar file to access the .bin file. If you specify the .bin file, the .sig file MUST be in the same location as the .bin file. ONIE:/ onie-nos-install tftp:////filename/diag-installer-x86_64dell__c2538-r0-2016-08-12.bin discover: installer mode detected. Stopping: discover... done. Info: Fetching tftp:///users///diag-installer-x86_64dell__c2538-r0-2016-08-12.bin ... users// 100 154M 0:00:00 ETA ONIE: Executing installer: tftp:///users///diag- 16 Dell EMC DIAG OS
-
 1
1 -
2
-
3
-
4
-
5
-
6
-
7
-
8
-
9
-
10
-
 11
11 -
 12
12 -
 13
13 -
 14
14 -
 15
15 -
 16
16 -
 17
17 -
 18
18 -
 19
19 -
 20
20 -
 21
21 -
22
-
23
-
24
-
25
-
26
-
27
-
28
-
29
-
30
-
31
-
32
-
33
-
34
-
35
-
36
-
37
-
38
-
39
-
40
-
41
-
42
-
43
-
44
-
45
-
46
-
47
-
48
-
49
-
50
-
51
-
52
-
53
-
54
-
55
-
56
-
57
-
58
-
59
-
60
-
61
-
62
-
63
-
64
-
65
-
66
-
67
-
68
-
69
-
70
-
71
-
72
-
73
-
74
-
75
-
76
-
77
-
78
-
79
-
80
-
81
-
82
 |
 |