Dell S6000 Dell Networking System Getting Started Guide - Page 18
Installing an AC or DC Power Supply
 |
View all Dell S6000 manuals
Add to My Manuals
Save this manual to your list of manuals |
Page 18 highlights
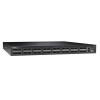
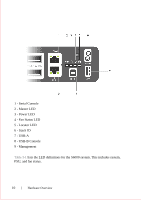
Installing an AC or DC Power Supply To install an AC or DC power supply, follow these steps. NOTE: The PSU slides into the slot smoothly. Do not force the PSU into a slot as this may damage the PSU or the S6000 chassis. NOTE: Ensure that the PSU is correctly installed. When the PSU is correctly installed, the power connector is on the left side of the PSU and the status LED is at the bottom of the PSU. NOTE: If you use a single PSU, install a blank plate in the other PSU slot. Dell Networking recommends using power supply 1 (PSU1) as the blank plate slot. Step Task 1 Remove the PSU slot cover from the S6000 (the PSU side of switch). You may select either of the two PSU slots. 2 Remove the PSU from the electro-static bag. 3 Insert the PSU into the switch PSU slot (insert the PSU exposed PCB edge connector first). The PSU slot is keyed such that the PSU can only be fully inserted in one orientation. 1 - Slot 1 2 - PSU1 When the PSU is installed correctly, it snaps into place and is flushed with the back of the switch. 14 Installation
-
 1
1 -
2
-
3
-
4
-
5
-
6
-
7
-
8
-
9
-
10
-
11
-
12
-
 13
13 -
 14
14 -
 15
15 -
 16
16 -
 17
17 -
 18
18 -
 19
19 -
 20
20 -
 21
21 -
 22
22 -
 23
23 -
24
-
25
-
26
-
27
-
28
-
29
-
30
-
31
-
32
-
33
-
34
-
35
-
36
-
37
 |
 |
