Dell Studio 15 Dell Studio 1555 Service Manual - Page 17
Display Panel - disassembly
 |
View all Dell Studio 15 manuals
Add to My Manuals
Save this manual to your list of manuals |
Page 17 highlights
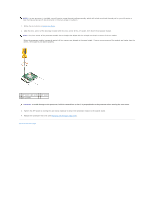
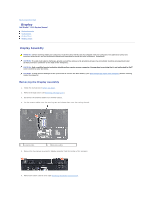
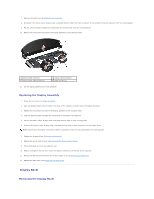
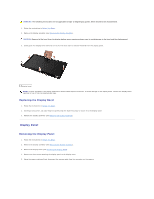
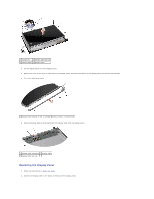
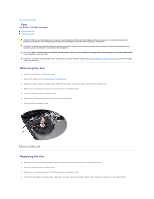
WARNING: The following instructions are not applicable to Edge-to-Edge display panels, which should not be disassembled. 1. Follow the instructions in Before You Begin. 2. Remove the display assembly (see Removing the Display Assembly). CAUTION: Removal of the bezel from the display bottom cover requires extreme care to avoid damage to the bezel and the display panel. 3. Gently push the display bezel outwards on each of the four sides to release the bezel from the display panel. 1 display bezel NOTE: In some computers, the display bezel has a double-sided tape on both ends. To avoid damage to the display bezel, remove the display bezel carefully to free it from the double-sided tape. Replacing the Display Bezel 1. Follow the instructions in Before You Begin. 2. Starting at any corner, use your fingers to gently snap the bezel into place to secure it to the display panel. 3. Replace the display assembly (see Replacing the Display Assembly). Display Panel Removing the Display Panel 1. Follow the instructions in Before You Begin. 2. Remove the display assembly (see Removing the Display Assembly). 3. Remove the display bezel (see Removing the Display Bezel). 4. Remove the four screws securing the display panel to the display cover. 5. Using the camera cable pull-tab, disconnect the camera cable from the connector on the camera.
-
 1
1 -
2
-
3
-
4
-
5
-
6
-
7
-
8
-
9
-
10
-
11
-
 12
12 -
 13
13 -
 14
14 -
 15
15 -
 16
16 -
 17
17 -
 18
18 -
 19
19 -
 20
20 -
 21
21 -
 22
22 -
23
-
24
-
25
-
26
-
27
-
28
-
29
-
30
-
31
-
32
-
33
-
34
-
35
-
36
-
37
-
38
-
39
-
40
-
41
-
42
-
43
-
44
-
45
-
46
-
47
-
48
-
49
 |
 |
