Dell Studio 15 Dell Studio 1555 Service Manual - Page 29
Replacing the Battery Latch Assembly
 |
View all Dell Studio 15 manuals
Add to My Manuals
Save this manual to your list of manuals |
Page 29 highlights
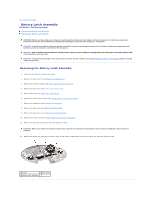
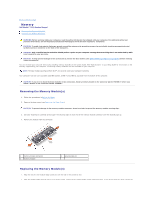
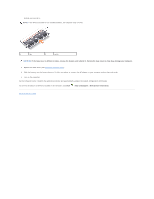
Replacing the Battery Latch Assembly CAUTION: Ensure the battery latch assembly is properly oriented. The indent for the screw should face up when installing the assembly. 1. Slide the battery latch assembly into place. 2. Replace and tighten the screw securing the battery latch to the battery release latch. 3. Using a small screwdriver, place the spring over the hook on the computer base. 4. Follow the steps in Removing the Battery Latch Assembly in the reverse order. Back to Contents Page
-
 1
1 -
2
-
3
-
4
-
5
-
6
-
7
-
8
-
9
-
10
-
11
-
12
-
13
-
14
-
15
-
16
-
17
-
18
-
19
-
20
-
21
-
22
-
23
-
 24
24 -
 25
25 -
 26
26 -
 27
27 -
 28
28 -
 29
29 -
 30
30 -
 31
31 -
 32
32 -
 33
33 -
 34
34 -
35
-
36
-
37
-
38
-
39
-
40
-
41
-
42
-
43
-
44
-
45
-
46
-
47
-
48
-
49
 |
 |

Replacing the Battery Latch Assembly
1.
Slide the battery latch assembly into place.
2.
Replace and tighten the screw securing the battery latch to the battery release latch.
3.
Using a small screwdriver, place the spring over the hook on the computer base.
4.
Follow the steps in
Removing the Battery Latch Assembly
in the reverse order.
Back to Contents Page
CAUTION:
Ensure the battery latch assembly is properly oriented. The indent for the screw should face up when installing the assembly.